Welcome back to this month’s edition of Mapping Class. The Mapping Class tutorial series curates video tutorials and workflows created by experienced cartographers and Avenza software users. With us today is Steve Spindler, a MAPublisher expert, and professional cartographer. Steve is back with a quick demo showing how he uses MAPublisher path utility tools and a custom Adobe script produced by Nathaniel Kelso to create unique mile marker symbols. The Avenza team has produced video notes adapted from the original article found on Steve’s personal blog.
***
Create Distance Marker Symbols in MAPublisher using Scripts by Steve Spindler (Notes adapted from the original)
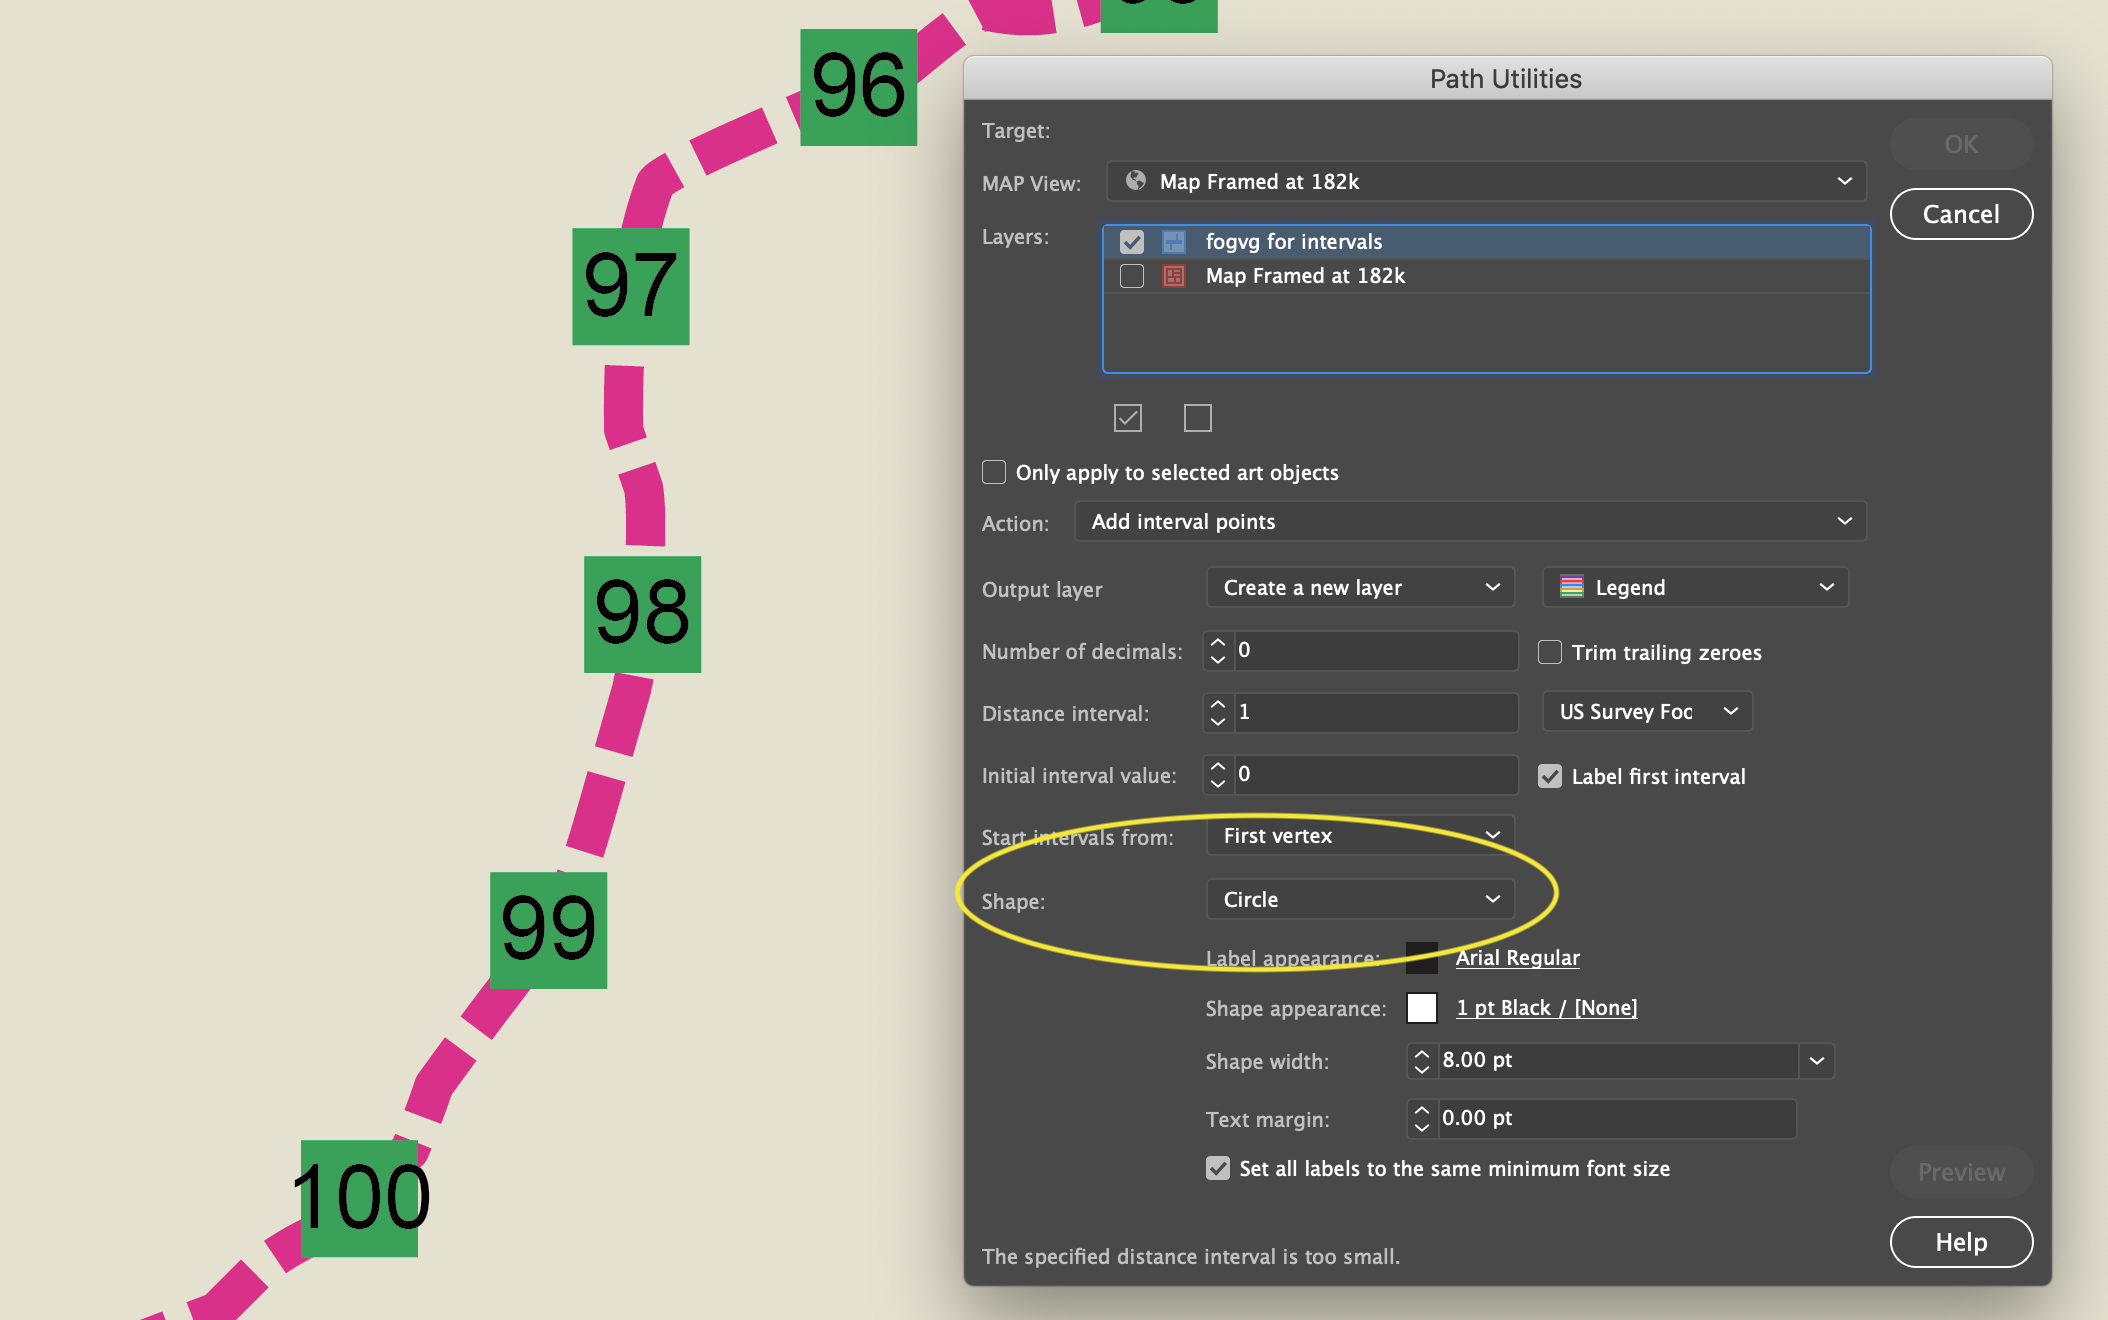
MAPublisher used within Adobe Illustrator enables us to create mile markers or other points along a line. I’m using this tool while working on the Genesee Valley Greenway map, and this video walks through the process.
Not shown in the video is how I set the direction of the line. Reversing the line direction is done using the MAPublisher Flip Lines tool. I just didn’t need to do this.
To set the mile marker preferences, we can use the Add Path Intervals in the Path Utilities tool.
This is pretty good, but if you want to customize the circle or square, it helps to convert the polygon objects into symbols.
Find and Replace Symbols Script
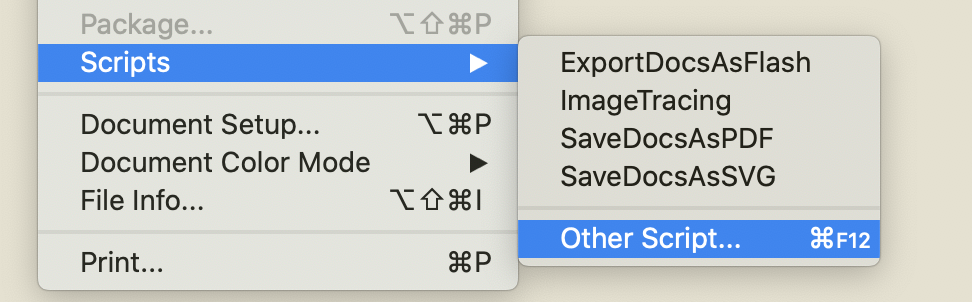
The script is called “Find and Replace Graphics” and can be found on Nathaniel Kelso’s website here. Save the script into the appropriate Adobe Illustrator Scripts folder. If you prefer, you can save the script elsewhere and navigate to the script manually using “File>Script>Other Script…”
Note: Save the script with the “.js” extension
To use it, I select all of the current objects that I want to replace and make sure they are on the same layer. I lock other layers. Then I add place a symbol on the same layer (ensure the symbol you want to use is the top-most object in the layer).
With the objects selected, run the script here.
All of the selected objects will be changed to the top-most object, which I set to be a symbol.
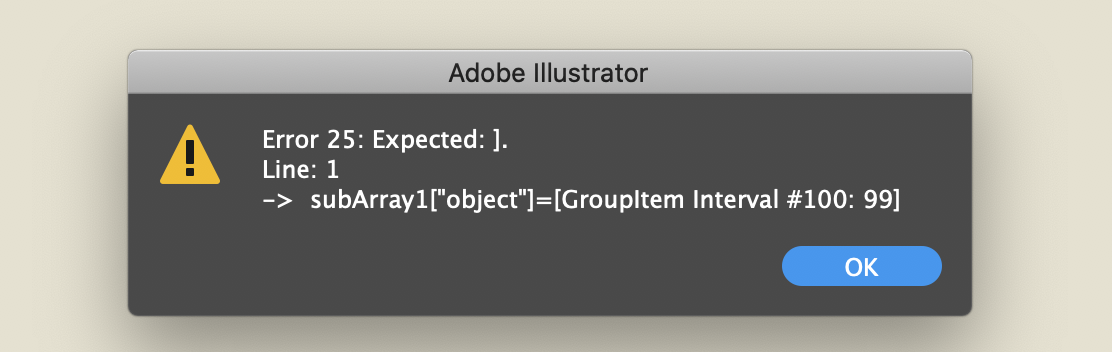
Select only the polygons, not the text. Otherwise, you will get this error.
***
About the Author
Steve Spindler has been designing compelling cartographic pieces for over 20 years. His company, Steve Spindler Cartography, has developed map products for governments, city planning organizations, and non-profits from across the country. He also manages wikimapping.com, a public engagement tool that allows city planners to connect and receive input from their community using maps. To learn more about Steve Spindler’s spectacular cartography work, visit his personal website. To view Steve’s other mapping demonstrations, visit cartographyclass.com
Welcome back to this month’s edition of Mapping Class. The Mapping Class tutorial series curates video tutorials and workflows created by experienced cartographers and Avenza software users. Joining us once again is Steve Spindler, a longtime MAPublisher user, and expert cartographer. Steve is here to show you a quick tip for using the attribute expression builder within MAPublisher to quickly perform batch edits of labels.
Steve has produced a short video to demonstrate how he uses the expression builder to quickly edit street names. The Avenza team has produced video notes (below) to help you follow along.
***
Label efficiently using Attribute Expression Builder by Steve Spindler (video notes by the Avenza team)
With MAPublisher, labeling your maps is a breeze. With powerful tools such as LabelPro, labeling is only a matter of selecting the data you want to label, and configuring a robust set of rules that control how each label is placed and styled. But before you can start labeling, you must have high-quality, accurate attribute information for your map data. Since labels are typically generated by displaying text values contained in an attribute column, it is important that attributes are not only accurate but are also formatted in a way that is optimized for display on a map. In many cases, cartographers need to spend time reformatting or editing attribute information before they can generate labels, a process that can become quite time-consuming. Nowhere else is this problem more common than when dealing with street names and road network data.
When labeling streets, cartographers often spend time correcting, or even generating brand new attribute information that can be used to create more concise, effective street labels. This typically involves changing street prefixes and suffixes to a condensed short form (i.e “North Cherry Boulevard” becomes “N Cherry Blvd”). For smaller projects, this can be done by manually editing the individual attribute values directly within the MAP Attribute panel. For large projects, especially those dealing with hundreds or even thousands of map features, manual editing would be very time-consuming.
For a more efficient approach, Steve shows how you can use the Expression Builder to easily modify large selections of attribute values. The first step is to open the MAP attribute table, which displays all the attribute information contained within a specific map layer. Steve identifies the attribute column that contains the text street names and will use this to build out a new attribute column to create his labels.
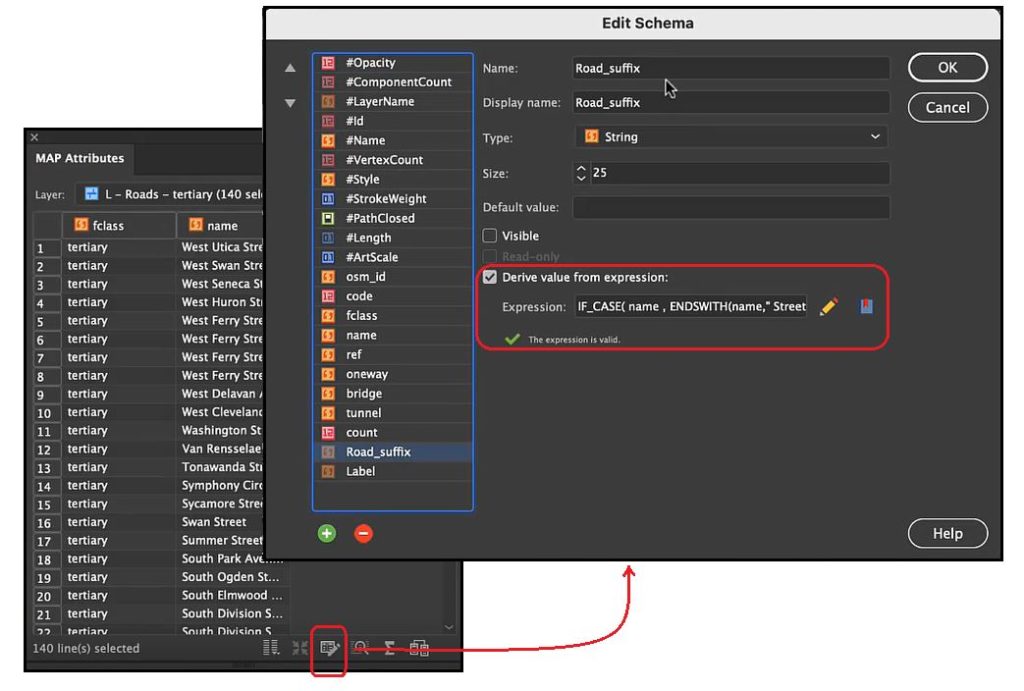
Next, Steve opens the Edit Schema window of the attribute table. Here, you can access column information such as the data type, default value, field visibility, and most importantly; the expression builder.
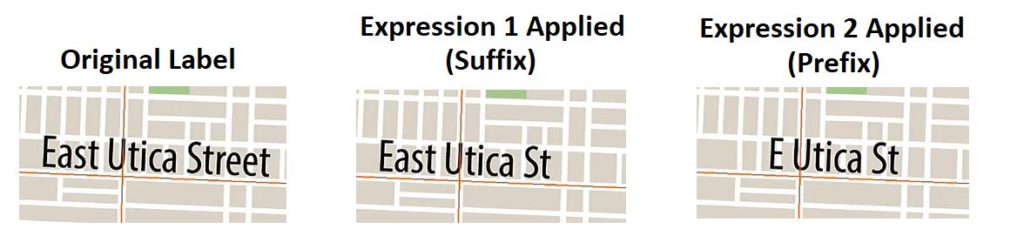
The expression builder may seem intimidating at first, but with a little bit of effort, it can be an incredibly powerful tool for calculating attribute values and performing batch-edits on your data. The tool uses built-in operators and items in the objects list (attribute names and values, constants, functions) to calculate custom attribute information based on a specified set of expressions. In this case, Steve first creates an expression set that modifies the suffix values in the Street name field (i.e “Boulevard”) and substitutes them with the appropriate short form (“Blvd”). The expression is used to populate a new attribute column called “Road_suffix”. The end result means attribute values such as “East Utica Street” will be passed to a new attribute value of “East Utica St”.
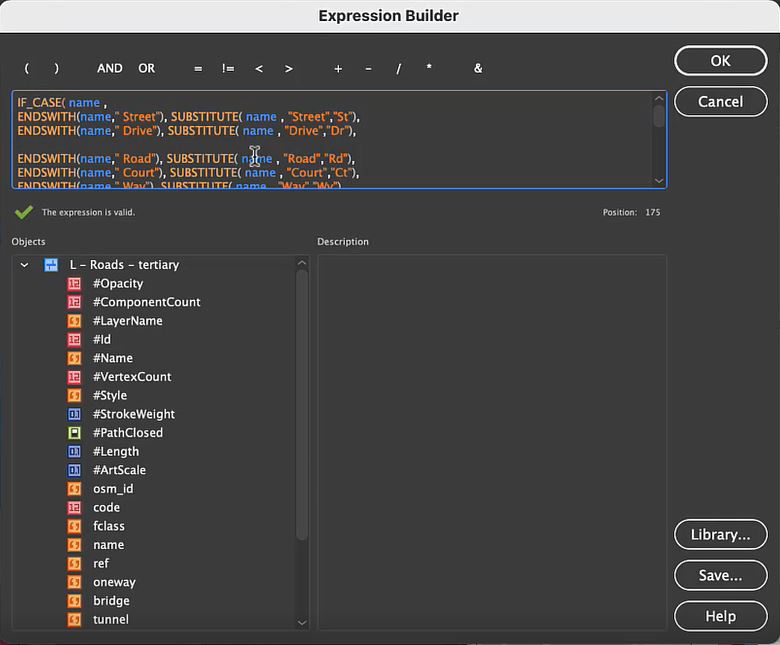
IF_CASE(name,
ENDSWITH(name, “ Street“),SUBSTITUTE( name , “Street”, “St”),
ENDSWITH(name, “ Drive“),SUBSTITUTE( name , “Drive”, “Dr”),
ENDSWITH(name, “ Road“),SUBSTITUTE( name , “Road”, “Rd”),
ENDSWITH(name, “ Court“),SUBSTITUTE( name , “Court”, “Ct”),
ENDSWITH(name, “ Way“),SUBSTITUTE( name , “Way”, “Wy”),
ENDSWITH(name, “ Lane“),SUBSTITUTE( name , “Lane”, “La”),
ENDSWITH(name, “ Route“),SUBSTITUTE( name , “Route”, “Rt”),
ENDSWITH(name, “ Boulevard“),SUBSTITUTE( name , “Boulevard”, “Blvd”),
ENDSWITH(name, “ Turnpike“),SUBSTITUTE( name , “Turnpike”, “Tpke”),
ENDSWITH(name, “ Avenue“),SUBSTITUTE( name , “Avenue”, “Ave”),
ENDSWITH(name, “ Place“),SUBSTITUTE( name , “Place”, “Pl”),
ENDSWITH(name, “ Circle“),SUBSTITUTE( name , “Court”, “Cr”),
ENDSWITH(name, “ Highway“),SUBSTITUTE( name , “Highway”, “Hwy”),
ENDSWITH(name, “ Expressway“),SUBSTITUTE( name , “Expressway”, “Exp”)
)
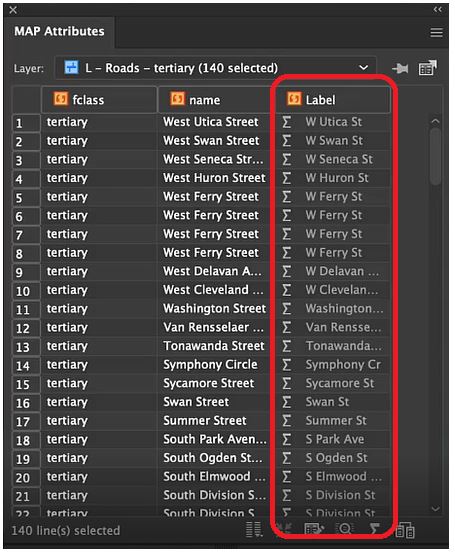
Next, Steve creates a second set of expressions that will further adjust his Road_suffix attribute column to substitute any street name prefixes (North, East, South, West) with their corresponding short-form (N, E, S, W). This second expression (see code block below) is used to populate another new attribute column called “Label”, which will ultimately be used to generate the final formatted label layer.
Note that these expressions are specific to the dataset and map area Steve is using for his project. When using expression builders for your own maps, pay careful attention to the attribute values specific to your area of interest. The best part about expression sets is that they are highly flexible, meaning you can build upon and modify existing expressions, save them to your library, and even use them across multiple different mapping projects!
With his newly created “Label” attribute column, it’s simply a matter of configuring the LabelPro tool to display these formatted label values. With a bit of configuration, the end result is a clean, uncluttered, collision-free label layer. The labels now use all the correct prefixes and suffixes Steve required. By saving his expression sets to his library folder, Steve can now quickly and easily repeat the exact same batch-editing process for new maps with only a few clicks!
***
About the Author
Steve Spindler has been designing compelling cartographic pieces for over 20 years. His company, Steve Spindler Cartography, has developed map products for governments, city planning organizations, and non-profits from across the country. He also manages wikimapping.com, a public engagement tool that allows city planners to connect and receive input from their community using maps. To learn more about Steve Spindler’s spectacular cartography work, visit his personal website. To view Steve’s other mapping demonstrations, visit cartographyclass.com
Maps are a fusion of art and science, presenting complex geographical data in a way that is both visually appealing and informative. Cartographers use maps to convey a story, drawing attention to important information using carefully crafted design choices and curated map elements that engage the viewer. Although cartographers employ a variety of specialised techniques to present this meaningful information on a map, one of the simplest, yet most effective methods is through map labels.
Quite simply, map labels are symbols or texts strategically placed at specific locations on a map to identify important geographical features, locations, or areas of interest. To a map viewer, labels are a quick and easy way to know exactly what is shown on a map. To a map maker, however, the task of creating labels is not often quick and generally isn’t easy. This is especially true when there are a large number of labels that need to be placed, or when labels need to follow complex paths such as roadways, rivers, or trails. Map-makers must also consider the issue of label crowding and collisions, ensuring labels are not overlapping each other, covering or distracting from other important features of the map. Combined, these challenges can be a significant time-sink in the map-making process, requiring both time and effort on the part of the cartographer.
Labelling doesn’t have to be difficult though, and in this blog, we will show you how built-in MAPublisher label tools and the MAPublisher LabelPro add-on can make labelling simple.
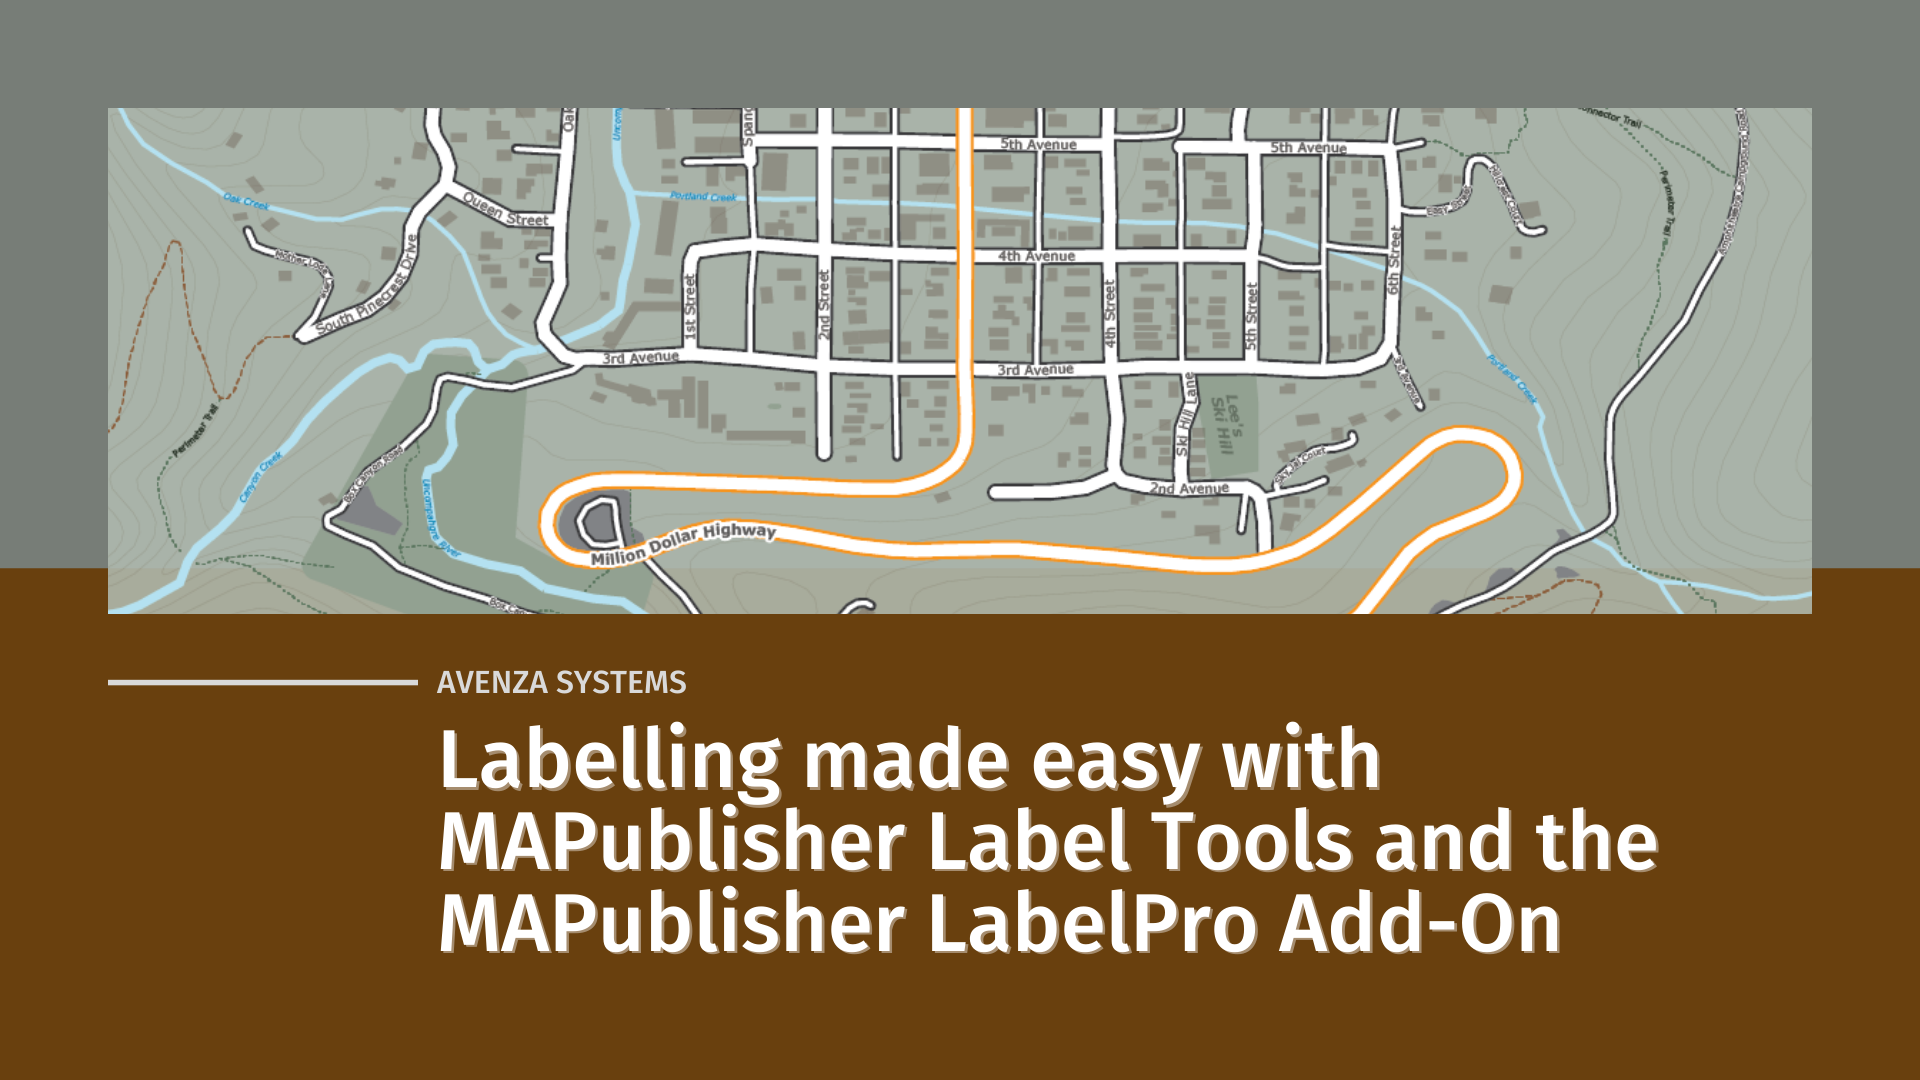
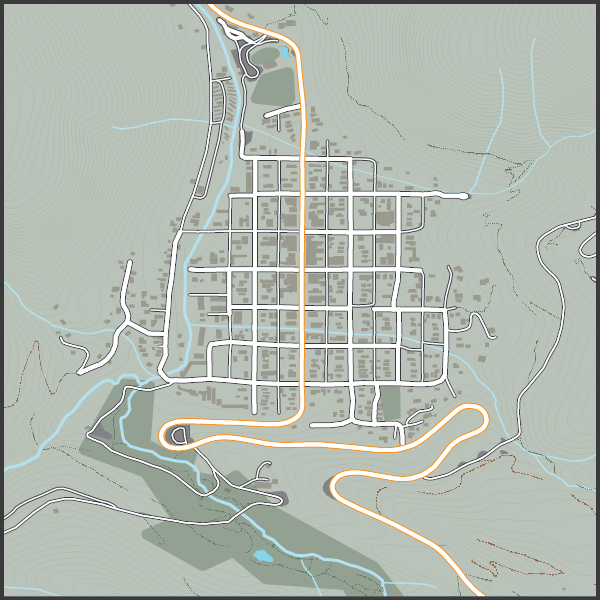
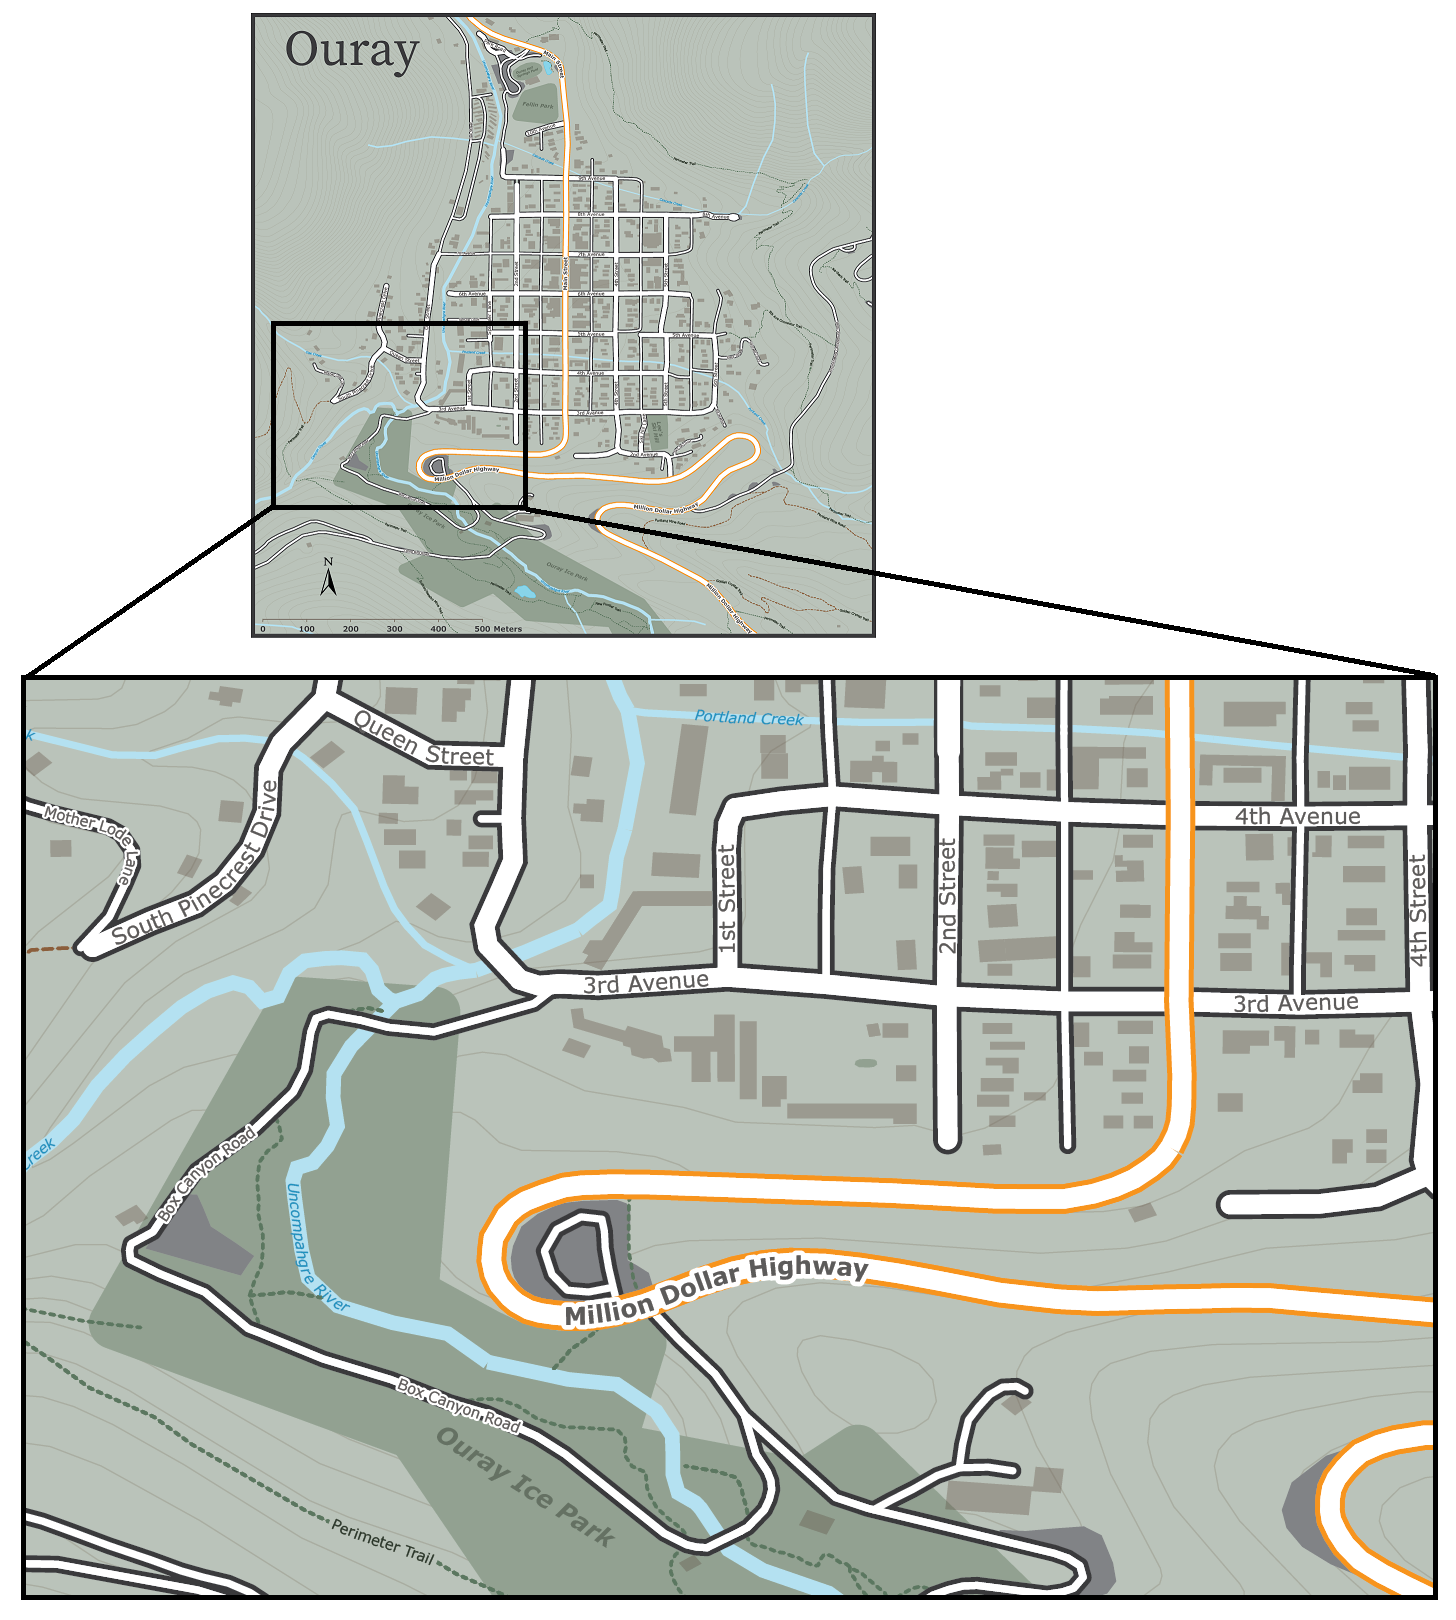
Let’s start with our unlabelled map. We have taken a collection of openly available geo-data depicting the small mountain town of Ouray, Colorado (home of National Geographic Cartographer and last month’s Avenza Cartographer Chronicles feature, Mike Boruta). We have stylized the data to show rivers, parks, streets and trails all throughout the town, but we feel labels would help a user to better understand the information being shown. We are going to approach the labelling process in a few different ways.
Manual Label Placement with the MAP Tagger Tool
For small labelling tasks, where a map maker might need to place only a handful of precisely located labels, the MAP Tagger tool is perfect for the job. MAP Tagger allows us to configure a basic set of options that control the character style of our label as well as general label placement rules. From there, we can simply click on a map feature and have the tool automatically detect and apply a label from attribute information contained in the selected layer. As we have direct control over the placement of every individual label, we can be extremely precise in choosing label placements that work for our map. Best of all, the tool automatically detects and applies text pathing for line features, meaning text labels can follow the form of any road, river, trail in your map!
When working with a small number of map features, the MAP Tagger tool is often just what you need to add well-placed labels to your map. For larger labelling tasks, such as our Ouray map, where there are many layers and several different features to be labelled, a manual approach such as this would be very time-consuming. Instead, we need to implement a more automated, batch labelling technique to speed-up the map-making process.
Batch label placement with the Label Features Tool
When you are working with several map layers, or have a large number of geographic features that each need to be labelled, it can be more efficient to create your labels all at once. The Label Features tool comes built-in with MAPublisher, and can handle batch labelling of map features with only a few clicks. The tool is designed similarly to MAP tagger, and automatically populates the map with precise, path-aligned labels, while offering the flexibility to define unique character styles for each map layer.
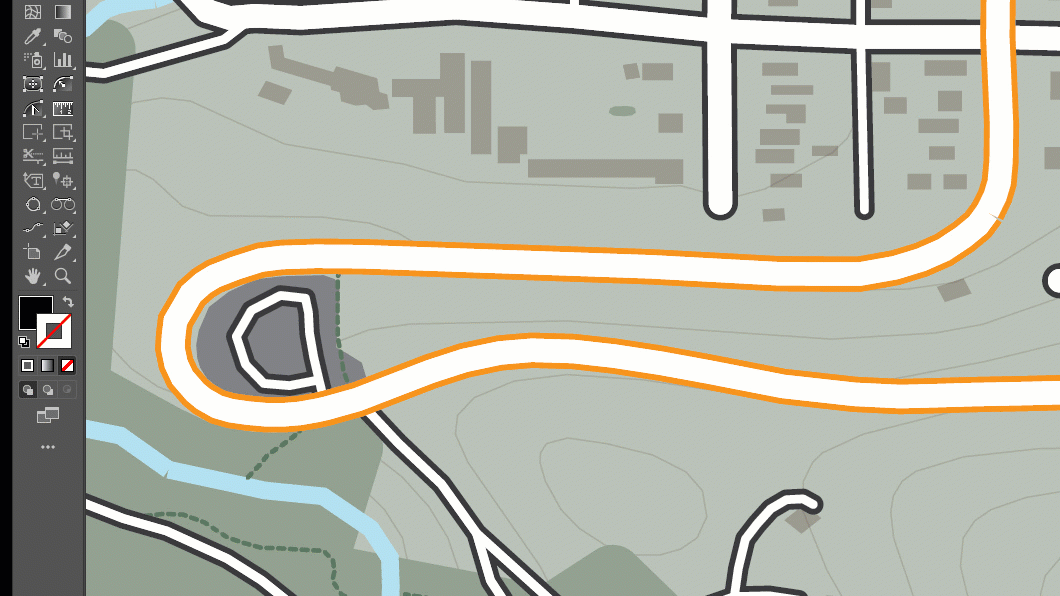
Taking a look at the tool, we were able to quickly generate over a hundred labels, for every road, trail, river, and park layer in our Ouray map. By nature, the tool will present you with a large number of labels for each feature, allowing us to examine and choose the labels we wish to retain and remove those that we don’t. With a little bit of clean-up to remove those extra or unwanted labels (see the animation below), we can already see our labelled map is coming together!
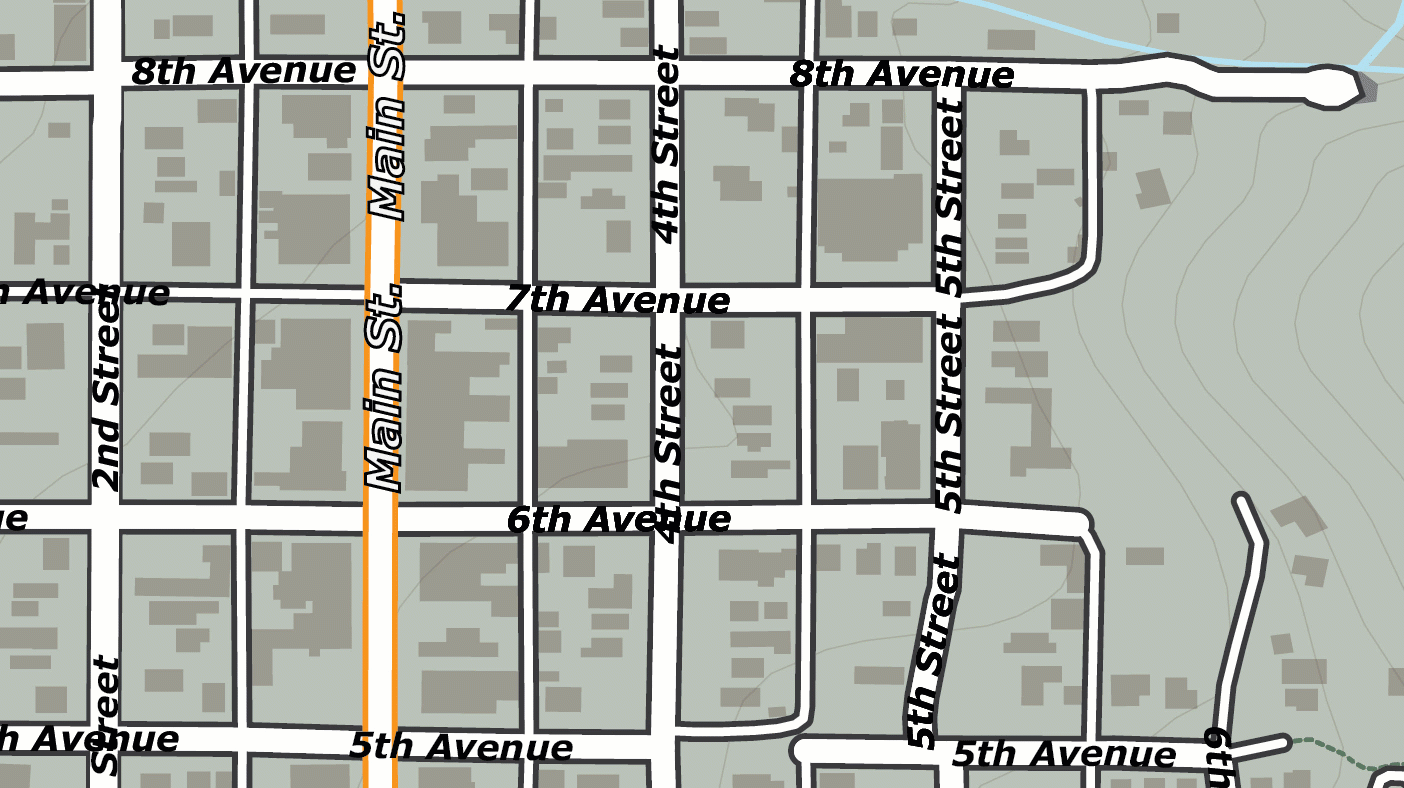
The Label Features tool is great for getting a head start on large labelling projects, but you might notice that the output of the labelling tool still requires some manual intervention to clean-up the output. For example, notice how “4th Street” and “5th Street” labels are repeated several times over the length of the street, with some labels colliding with others to create an overlap. This is a common problem in many labelling tasks and is due to the way our input data is structured. The dataset we obtained presents each road in the town as a line, but rather than present each road as a single continuous feature, it breaks up each street into several linked segments. Although this can be corrected with manual editing, it can still be time-consuming when working with a high number of labelled features. To avoid this, we need a method of achieving smarter batch label placement that can detect and reduce instances of label collision or redundancy.
Fortunately, we have one last trick up our sleeves that makes even the most complex labelling tasks a breeze. We can use MAPublisher LabelPro for collision-free, rules-based label placement.
Better Labelling with MAPublisher LabelPro
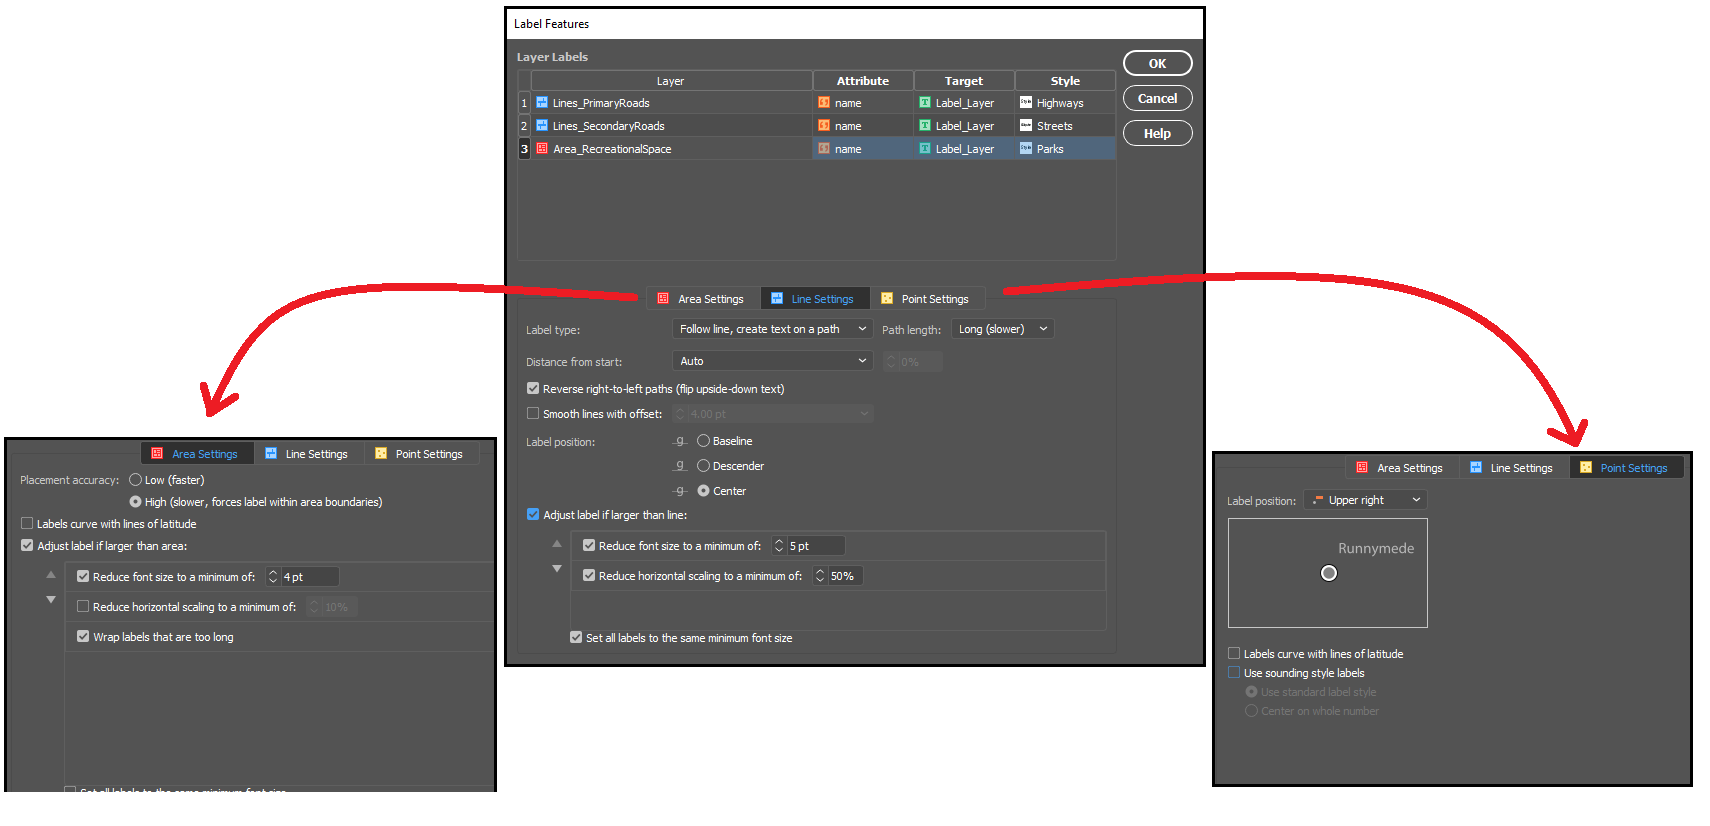
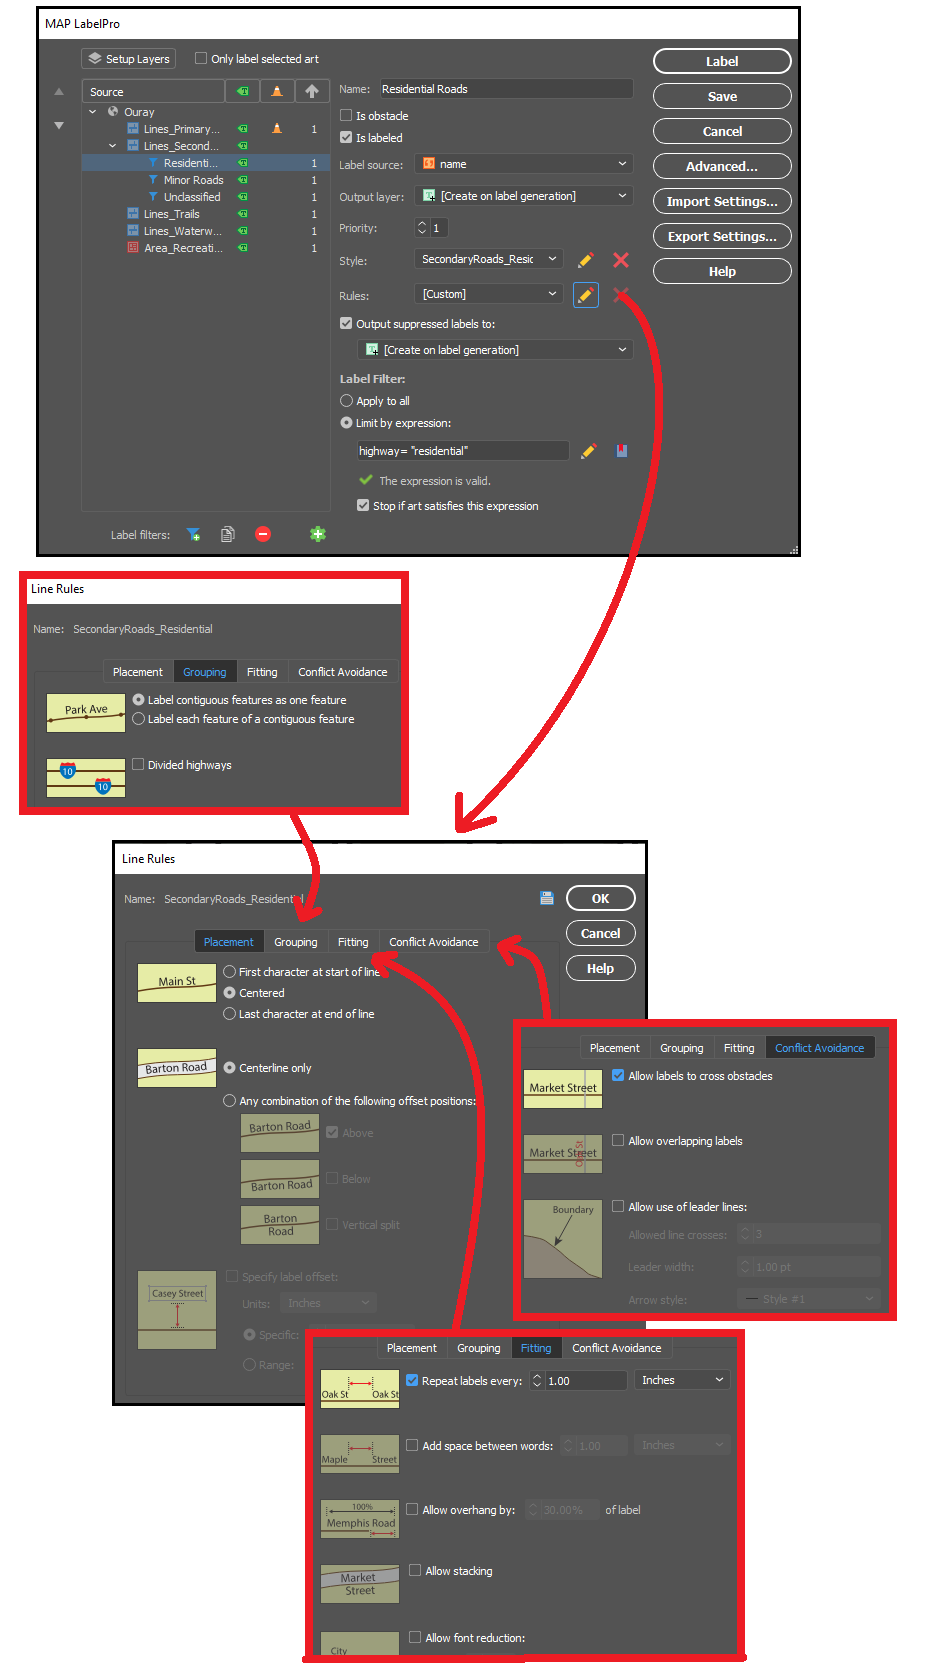
The MAPublisher LabelPro add-on allows the user to customize a wide variety of enhanced labelling options that result in smarter, more efficient label placement. LabelPro comes with a powerful purpose-built labelling engine that handles not only label placement, styling, and pathing, but also optimizes the grouping, fitting, and collision avoidance of labels to reduce crowding, avoid label overlap, and eliminate label redundancies.
Remember those overlapping labels we ran into with the Ouray map? With LabelPro we can set rules that treat street segments as contiguous features in a single line, meaning the labelling engine will efficiently place labels that are representative of the entire street, rather than just for each segment. The intelligent collision and fitting rules mean we can also prevent labels from overlapping each other or crowding the map, saving us time and effort by letting the tool handle precise label placement with minimal clean-up. By setting layer priorities designating certain layers as obstacles we can make sure our important labels are unobstructed, and other labels do not cross other features in a way that would confuse the map viewer.
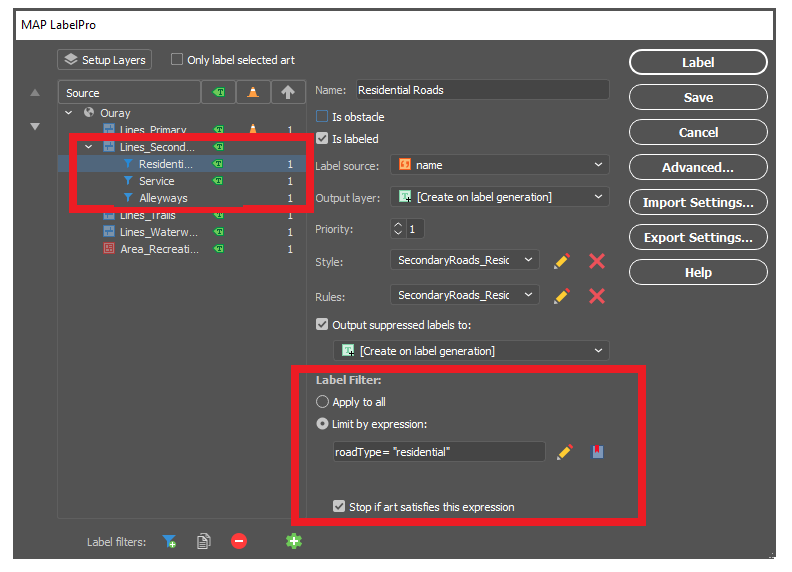
With LabelPro, we can also create expressions to apply conditional character styles and rules based on attribute values in the data. In our map, we created label filters for “Residential Roads”, “Service Roads”, and “Alleyways”, allowing us to label (or not label) certain road types differently, even though they are all contained in the same “secondary roads” map layer. These are only a few examples of the robust collection of configurable rules and smart labelling options available to tackle even the most complex labelling tasks.
With our rules set up and all character styles defined, in very short order we could automatically generate labels for all rivers, roads, highways, parks and trails in our Ouray map. The smart placement with LabelPro means we spend less time manually correcting label placement and allows us to produce maps more efficiently and easily. If you want to read a more in-depth, tutorial style article that shows you the exact steps we used to easily create our simple map of Ouray, check out this great workflow article produced by our support team – Here!
Data sources: All datasets were obtained from OpenStreetMap and the Ouray County Open Data portal.