My Account     Contact Us     Cart

Getting to Know the MAP Measurement Tool

In this blog, we’ll be highlighting a very useful tool that may fly under the radar to the average MAPublisher user: the MAP Measurement tool! This tool is great for measuring the distance between two or more points, azimuths, and even the perimeter and area of closed paths. It is a great addition to your arsenal of regular MAPublisher tools because it can be customized to suit a variety of measuring methods, units, and shapes. 

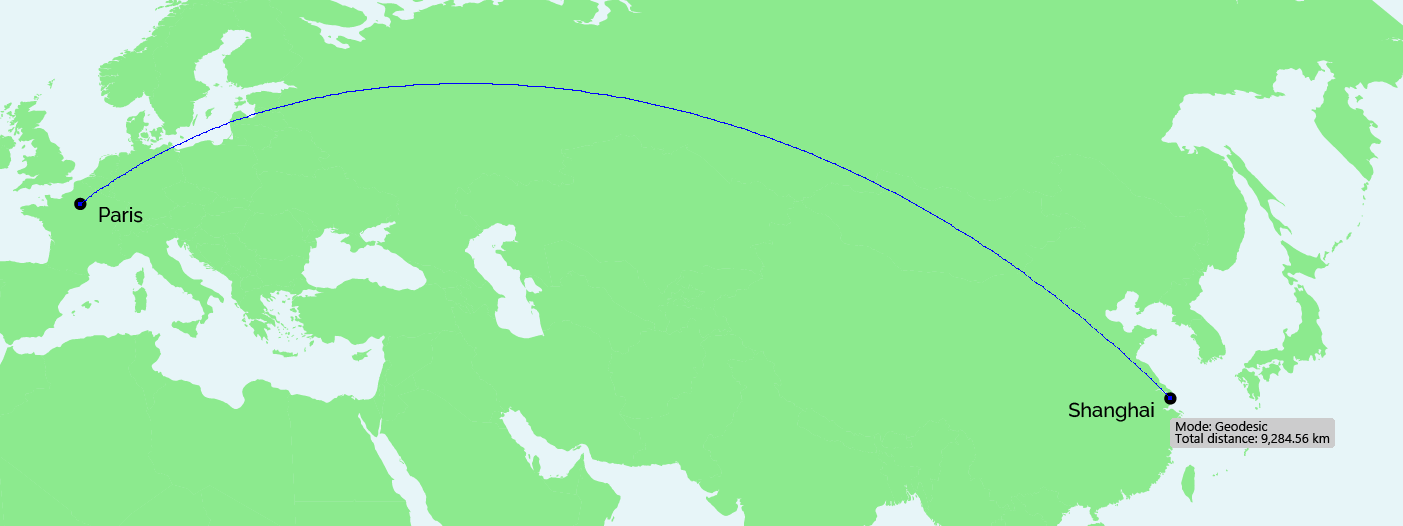
The MAP Measurement tool can be used to calculate the Euclidean distance between any two or more points on a map. This can be done using one of three calculation methods: geodesic (based on datum), cartesian (based on map projection) or Rhumb line. In the example below, I have calculated the distance between Paris and Shanghai using a geodesic method, which is why the line appears rounded rather than straight in the current Natural Earth projection. 

MAP Measurement tool between two points

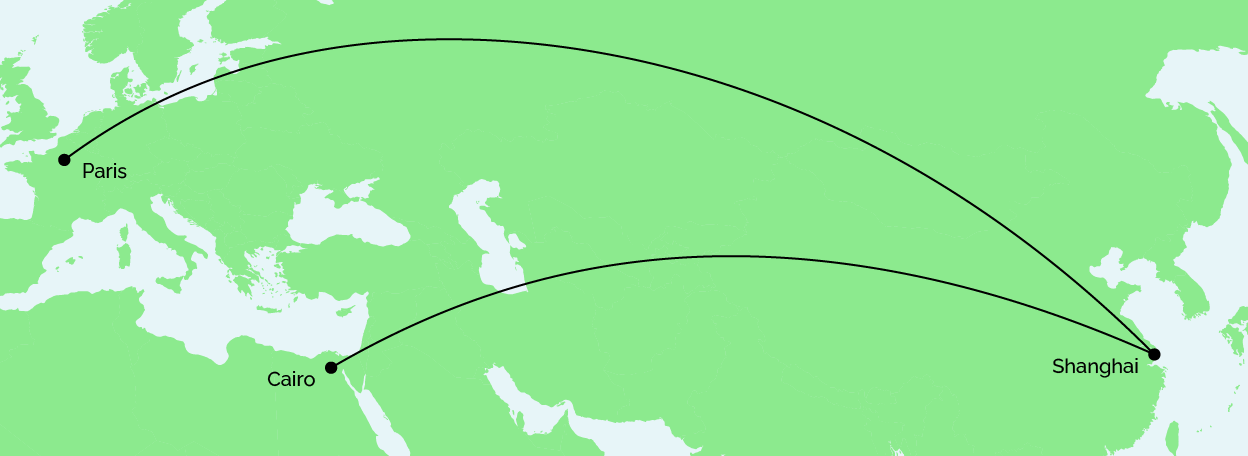
I can incorporate multiple points in my calculation, and the total distance will continue to increase. You can also hold the Alt/Option key while drawing to display the length of each line segment in your trip. In my example, I have decided to add a point in Cairo to follow Shanghai, as seen below.

MAP Measurement tool being used on three successive points

Once I have finished adding points to my map, I have the option to convert the measurement line to art in my currently selected layer. This is a great way to quickly and accurately draw lines between points on certain types of maps that require it, such as a flow map or flight map.

MAP Measurement tool lines converted to Illustrator art

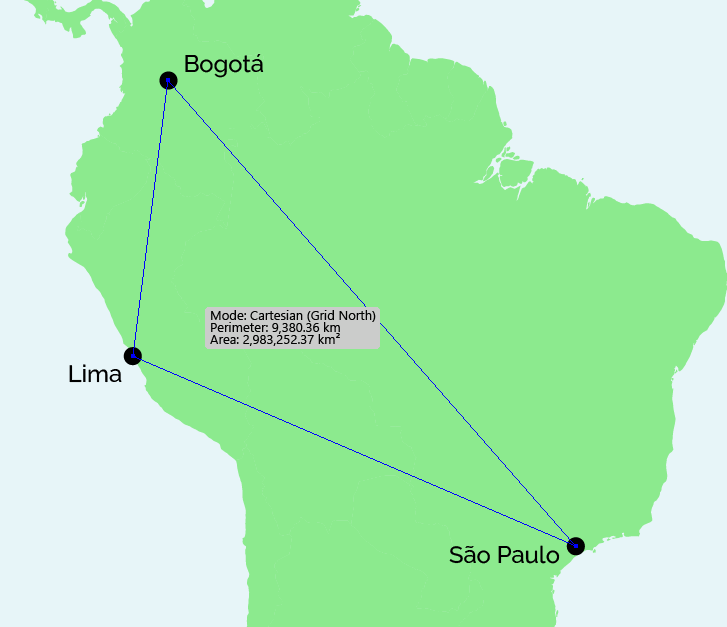
The MAP Measurement tool can also be used to measure perimeter and area of polygons. In the example below, I have calculated the perimeter and area of a triangle drawn between the points of Bogotá, Lima and São Paulo.

MAP Measurement tool being used to measure area and perimeter of a polygon

This blog only outlines a few of the use cases of the MAP Measurement tool, however there are countless other ways that you can apply this tool to your cartographic designs. The possibilities are virtually endless!

For more information about the MAP Measurement tool, check out our Support Centre article.

Can You Create a Map in 5 Minutes?

The Day 13 theme of the #30DayMapChallenge was more of a question: can you create a map in 5 minutes? Well, we were up for the challenge! Here at Avenza, we used this as an opportunity to teach our marketing team (with limited GIS experience) the basics of cartography. In the weeks leading up to this day, we taught them how to perform a few simple tasks in MAPublisher to create a basic map of South America.

Simplified Steps for Creating a Map

We broke down the process of making this map into five general steps for the purpose of simplicity.

Import Data

The first step was to import country area data using the Import button on the MAP Toolbar. After import, the Artboard tool was used to adjust map boundaries to the desired position. The MAP View Editor could also be used to fine-tune the movement of the data. 

Stylize Data

The second step was to add a stylesheet to the countries using the MAP Themes button. From here a stylesheet was created by clicking the Add button and creating an area stylesheet. The stylesheet editor was then opened, and the style was assigned to the country layer. The Batch Generate Rules… button was very helpful in quickly creating categories for the data based on the desired attribute. For example, one map was created using the Population Density attribute. The categories were assigned a style based on a pre-selected colour ramp. Finally, a rule was created to create a grey style for the part of North America that attaches to South America.

Add a Legend

Using the hamburger menu button in the MAP Themes panel, step three included creating a legend for the map. Removing Rule 1 from the list and adding a title (if desired) were the only extra steps necessary here.

Add Labels

In step four, the goal was to add a label for the country names. We used LabelPro for this to make it quick and simple. We enabled leader lines to ensure all countries were labeled even if the label was too large.

Add Finishing Touches

Finally, we added a title and supplemental text and objects to the map. All of these elements were added to the document using native Adobe Illustrator tools.

Our process of creating a map in 5 minutes was recorded and condensed into a 30-second video. See it, and the other resulting maps, below!

Formation en ligne inter-entreprise sur MAPublisher: 19-23 mai 2025

Que vous soyez un professionnel des SIG ou que vous débutiez tout juste dans le domaine, cette formation vous propose de prendre en main MAPublisher® de manière approfondie! Rejoignez nos amis de Géom@tique du 19 au 23 mai pour cette formation en ligne! Les inscriptions et plus d’informations sont disponibles sur leur site web.


Whether you’re new to GIS or an experienced user, this course will give you an in-depth introduction to MAPublisher® in French! Join our friends at Géom@tique from May 19th to 23rd for this online training! Sign ups and more information are available on their website.

Map Gallery Spotlight: Roger Smith

We are showcasing the Open-category winner of the 2021 Avenza Map Competition. This fantastic entry was created by Roger Smith, expert cartographer and owner of Geographx in Wellington, New Zealand. Roger’s grand-prize winning entry is a truly remarkable display of map craftsmanship. The map provides a detailed look at the topography and trail coverage surrounding one of New Zealand’s most beautiful wilderness areas. His expert usage of natural colour basemaps and shaded relief creates a truly stunning result.

This topographic map focuses on the area covered by Westland Tai Poutini National Park, Aoraki/Mount Cook National Park, and the adjacent conservation parks and designated wilderness areas. It presents park boundaries, back-country walking trails, and the many camping shelters that are scattered throughout the area. The map itself is designed for print as a wall map and utilizes a natural colour basemap to create an eye-catching visual guide for the region.

The map can be used to familiarize park visitors with the area and assist recreational visitors with trip-planning in the rugged back-country trails of the area. The natural colour basemap is designed to maximize viewer understanding and appreciation of the physical environment while providing a pleasing backdrop that highlights important points, trails and places on the map.

Select the images below to see a detailed look at Roger’s map

Making the Map

The cartographic design elements and vector art creation utilized a wide range of tools in MAPublisher. Some of the vector data that went into the map were obtained through the New Zealand Department of Conservation, and the Land Information Department, while others were custom-crafted by Roger and his team at Geographx. Notably, the Geographx team custom-built the natural colour basemap and DEM-derived hillshade that gives the map its unique look and feel.

MAPublisher allowed Roger to import his data layers into an Adobe Illustrator environment that was conducive to flexible cartographic design work. Using the MAP Views panel, he could easily adjust and modify the projection and scaling of his map. Where necessary, Roger leveraged the many MAPublisher Geoprocessing and Data Editing tools to manipulate or simplify vector art layers for better representation on the final map.

As MAPublisher maintains spatial referencing for each data layer, he could place and register his custom natural colour, and raster hillshade layers to create his basemap. Fine-tuning would ensure his vector layers (including roads, campsites, trails, and place markers) would all be accurately placed and aligned with their real-world locations.

Roger created unique labels for the hundreds of different placemarks and trail lines on the maps. Using MAP Attribute data that are retained for each data layer, Roger used the Label Features tool to efficiently create and place labels for each layer. With Label Features, Roger could define custom rules that ensure each label stands apart from the other. For important place markers and points of interest, Roger used the Create Halos tool to make certain labels stand out more prominently.

Needless to say, this spectacular piece of work represents the culmination of countless hours of design effort and dedication. Roger has added this map to the impressive collection of cartographic works produced by Geographx. To learn more about other fantastic map products available from Geographx, visit their website.

What’s New in MAPublisher 11.0 for Adobe Illustrator?

What's New in MAPublisher 11

We are very excited to announce the release of MAPublisher 11, the latest version of our MAPublisher extension for Adobe Illustrator. 

With MAPublisher 11, we are bringing forward full compatibility with the Apple Silicon processor, enhancements to the MAP Attributes panel, a revamped welcome screen, the ability to import OpenStreetMap file formats, a brand new set of MAP Erase tools, and several performance and bug fixes.

Here’s what you can expect with the latest MAPublisher 11 release:

Compatibility with the Apple Silicon Processor

We want to ensure our users enjoy a truly seamless experience whether they are using a PC or Mac computer. Our team has worked to ensure that MAPublisher 11 is fully compatible with the Apple Silicon chip, and as such we can declare that MAPublisher is officially supporting this processor.

MAP Attributes Panel Enhancements

An exciting feature for MAPublisher 11 is a number of enhancements made to the MAP Attributes panel. Users are no longer required to select all objects on a layer for them to appear in the MAP Attribute panel. Instead, all features appear by default, and users can toggle between showing all features or just their selected features at the bottom left corner of the panel. When all features are shown, selected features will appear highlighted in the attribute table.

Welcome Screen Revamp

MAPublisher 11 comes with a brand new welcome screen that appears upon opening the program. This window is equipped with visually appealing refreshed graphics, while maintaining access to the License Management window. It also features several new sections that increase discoverability for you, such as new features, help and tutorials, and other Avenza news or events. There is also a Get Inspired section to help inspire you as a mapmaker, which features articles from our website which highlight the excellent maps and stories of some of our most proficient users.

Importing OpenStreetMap File Formats

We are thrilled to announce that importing OpenStreetMap (OSM) file formats is now a possibility with MAPublisher 11! Whether you are importing a single file, or using the Multiple Data Import tool you can now select OSM and PBF file formats from the list of supported formats. The rest of the import process remains unchanged from the other file formats users are familiar working with in MAPublisher.

MAP Erase Tools

Many of our users have requested the ability to quickly erase unwanted or sensitive data from their maps. Thus, we are happy to introduce the new MAP Vector Erase and MAP Erase by Shape tools that come along with MAPublisher 11!

MAP Vector Erase Tool

With the new release of MAPublisher 11 comes a new tool known as the MAP Vector Erase tool. Functioning as an inverse version of the MAP Vector Crop tool, the Erase tool removes all data within a specified rectangle or ellipse shape.

MAP Erase by Shape Tool

The new MAP Erase by Shape tool functions similarly to the MAP Vector Erase tool, but it allows users to easily erase portions of MAP Layers using shapes other than rectangles and ellipses. Users can simply select the shape object they wish to use as the erase boundaries, and then select the MAP Erase by Shape tool from the MAP Toolbar. 

Both tools share the same customizable settings and advanced options. Like the MAP Crop tools, the MAP Erase tools can be applied to all layers within the document, all layers within a single MAP View, or just a single layer.

If you would like to learn more about the new MAPublisher 11 features or have any questions, please check out our Support Centre.

MAPublisher 11 is immediately available today, free of charge to all current MAPublisher users with active maintenance subscriptions and as an upgrade for non-maintenance users. 

News Archive