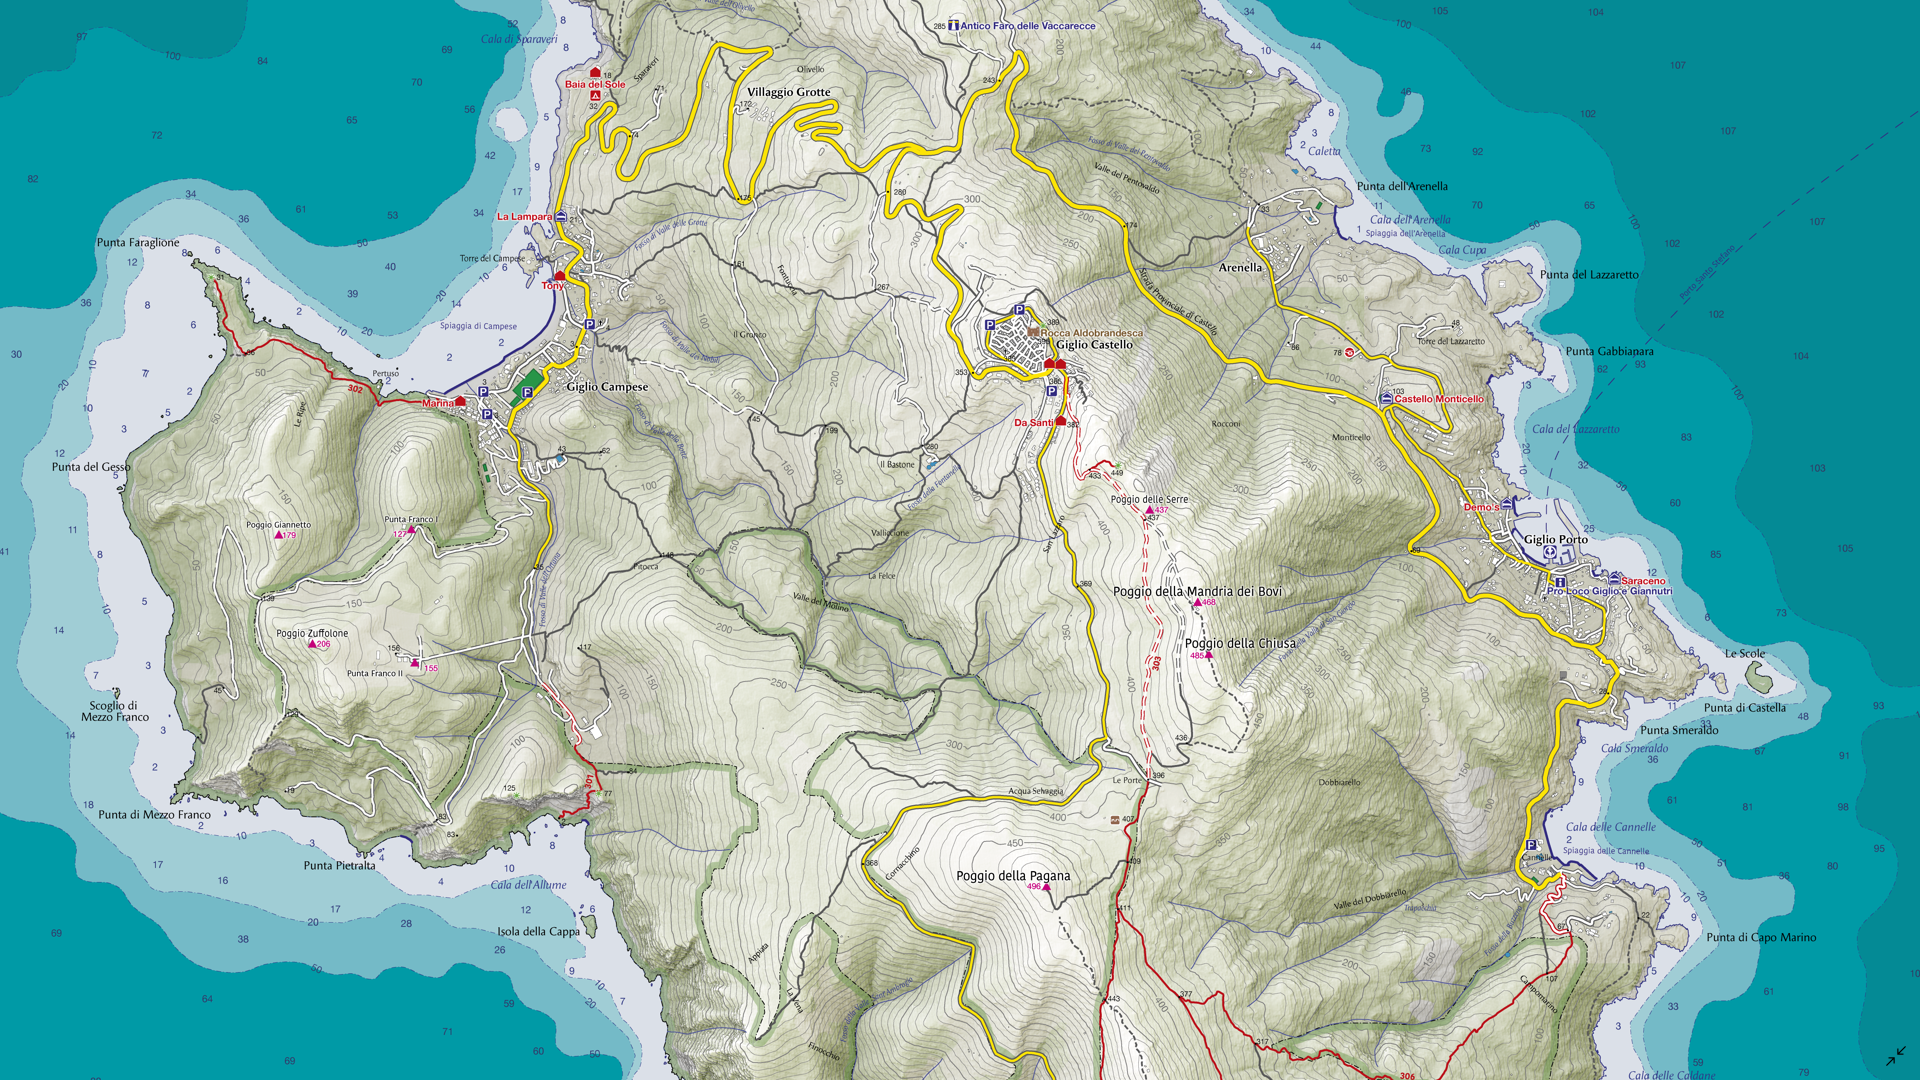
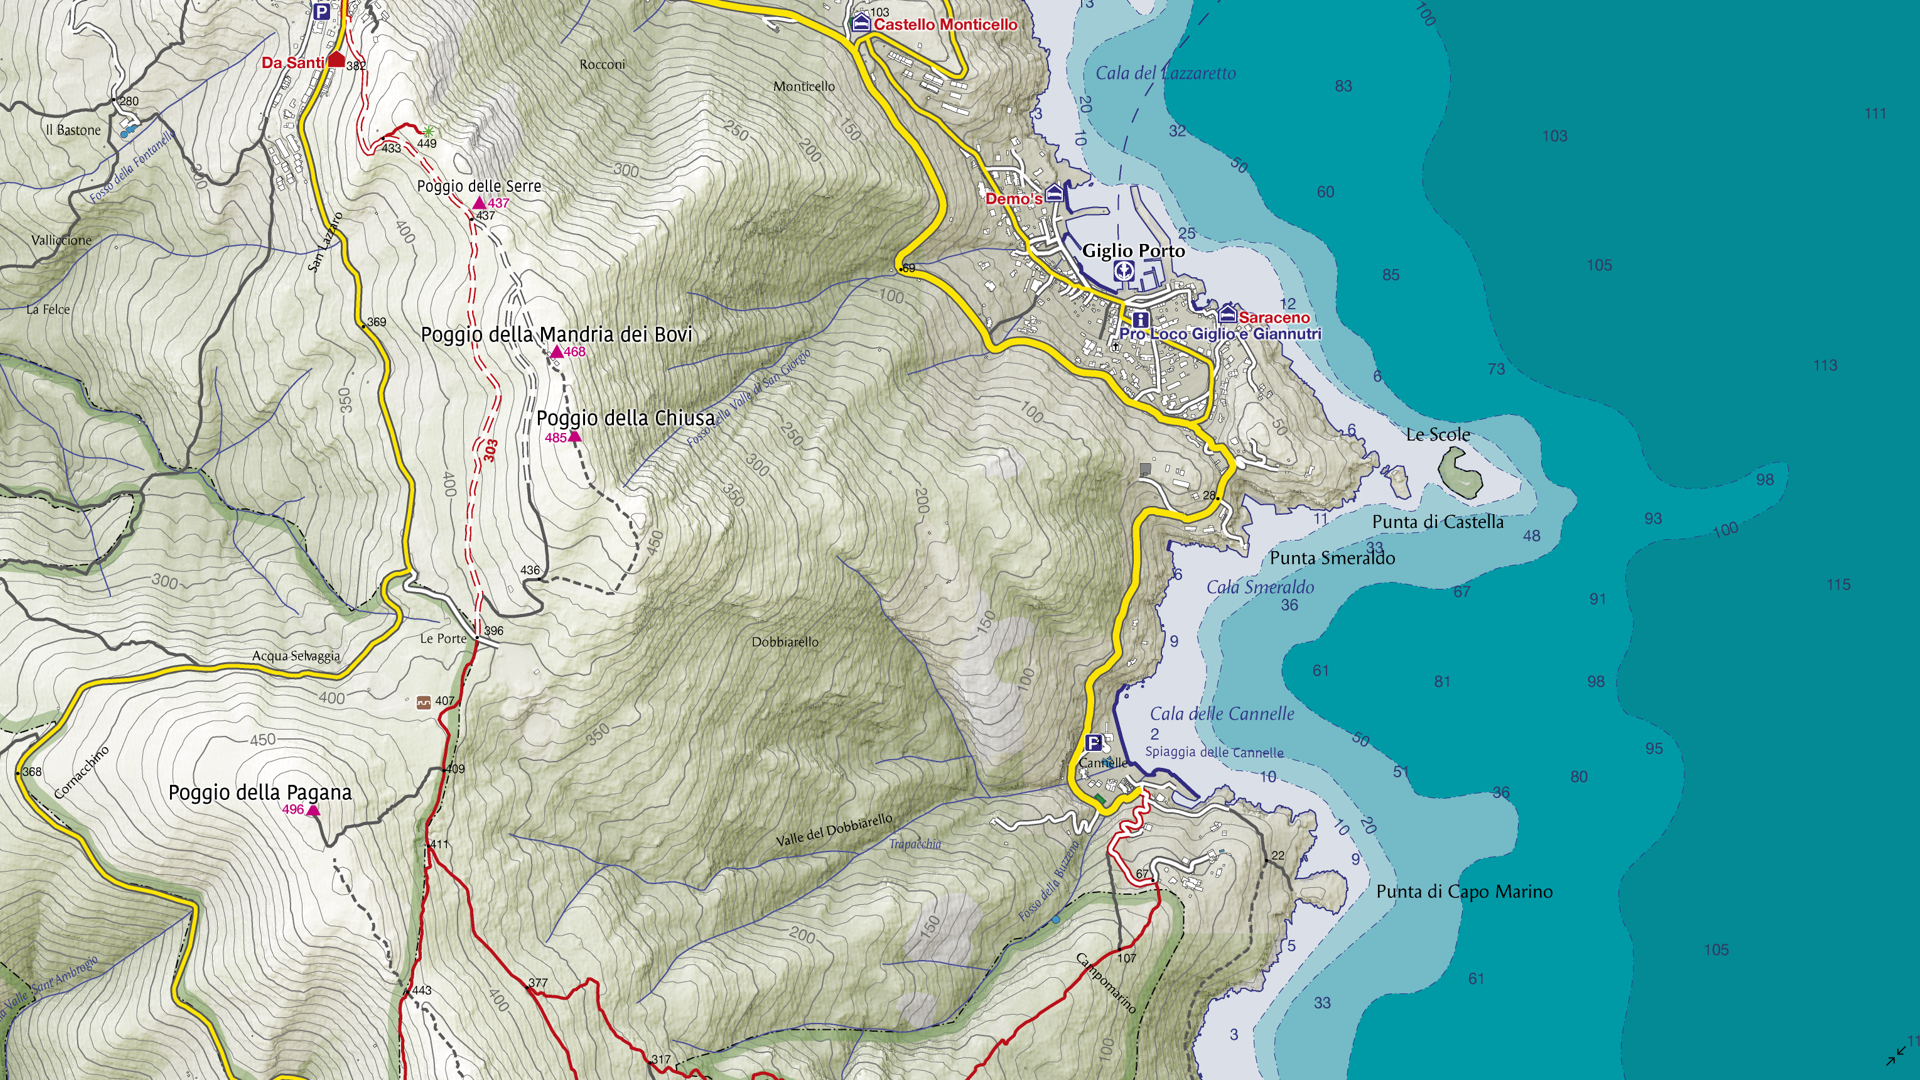
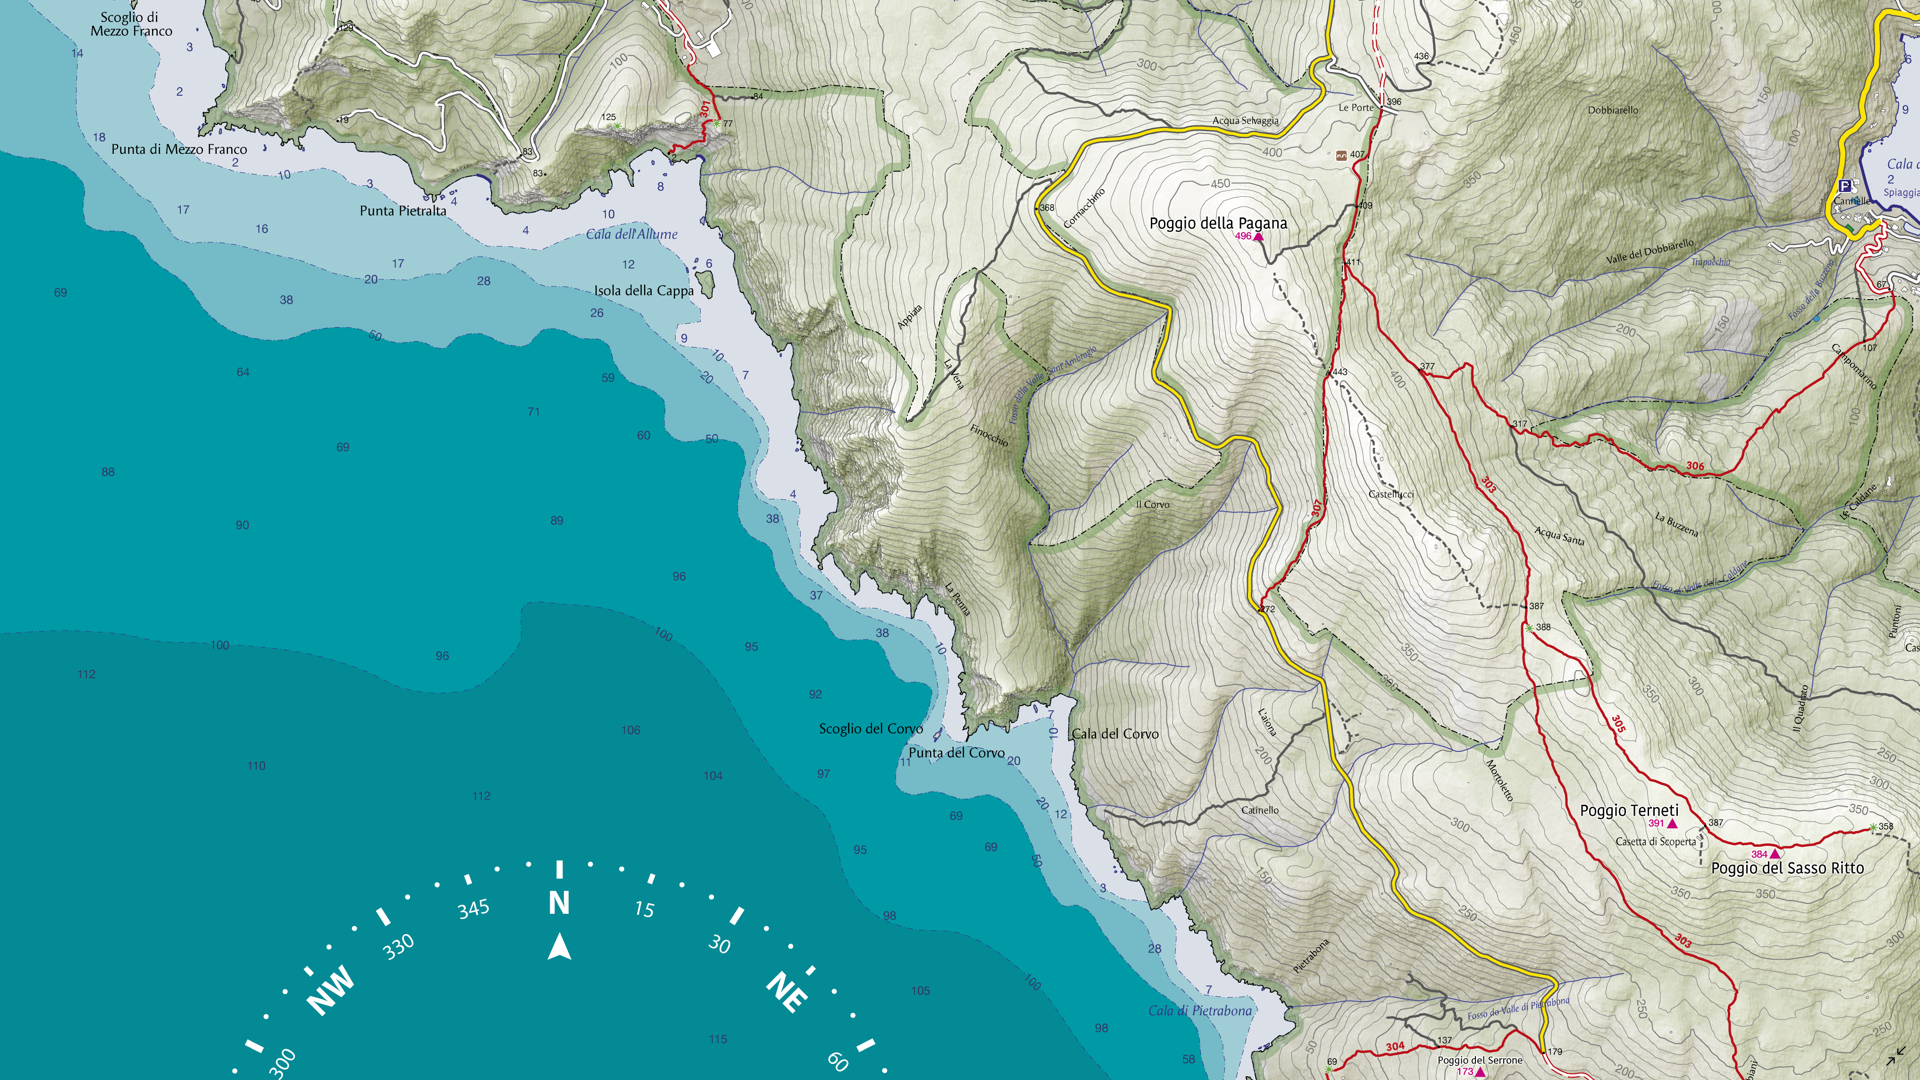
My Account     Contact Us     Cart

Map Spotlight: Russell Fjord Wilderness by Aaron Taveras

For our monthly Map Spotlight of July, we are displaying another superb honourable mention of the 2021 Avenza Map Contest: Russell Fjord Wilderness by Aaron Taveras of Cartografix. This outdoor recreation map was created to help visitors navigate the Russell Fjord Wilderness area and find the few trails that exist around the Yakutat region of Alaska. The map consists of two pages which illustrate the beautiful glaciers and rocky moraines, both of which make the area a popular destination for backcountry travel. Aaron combined essential topographic detail with recreational points of interest which resulted in a visually stunning yet useful cartographic product.

A fun fact: this map was selected to be used in the main software graphics for MAPublisher 11. It is available for purchase as a bundle digitally on the Avenza Maps Store.

Select the images below to see a detailed look at Aaron’s map

Making the Map

Aaron used both Geographic Imager and MAPublisher in the creation of this map. Geographic Imager was used in Adobe Photoshop to build the shaded relief images for the background of the map. The Terrain Shader makes it quick and easy to create a shaded relief by simply inputting a Digital Elevation Model (DEM). After this, the shaded relief image could be imported into MAPublisher and used as the background for the map.

Aaron imported his vector data and his shaded relief image into MAPublisher. MAP Stylesheet Themes were used to stylize the vector data such as the glaciers, land cover and water features. The Create Halo tool was used to create the thick and slightly transparent borders of the various parks and preserves in the region.

One of the standout features of Aaron’s map is the contour lines illustrating the terrain of the Russell Fjord Wilderness. The lines can be smoothed out using the Simplify Art tool to make them more visually appealing. The MAP Contour Tagger tool could then be used to manually create elevation labels for the contour lines, which allowed Aaron to select their exact placement in a visually appealing and uncrowded manner. Another important aspect of contour lines is that the text labels are readable, since they are usually obscured by the contour line itself. The Create Knockouts tool is perfect for ensuring that any text or features obscured by other features can be visible. Create Knockouts was used to create a gap in the contour lines where the contour labels (and other labels such as glacier names) exist.

The Grids & Graticules tool was essential in Aaron’s addition of such features to the map, with a UTM grid of 3000 meters being visible across the entirety of the map. Finally, Aaron used the Scale Bar and North Arrow features to easily ensure his finishing touches were placed correctly. Check out his north arrow that shows both true north and magnetic north and the difference between the two!

Learn more and enter the 2024 Avenza Map Contest here, and check out our other Map Spotlight blogs here!

Map Spotlight: Winter Trails of Methow Valley by Matt Dressler

In this month’s Map Spotlight we are showcasing an honourable mention of the 2021 Avenza Map Contest: Winter Trails of Methow Valley, WA by Matt Dressler. This map was created to provide visitors to the region with all the information needed to plan, explore and navigate within the Methow Valley of Washington, the largest Nordic ski trail system in North America. The map provides users with valuable trail information including difficulty, trailheads, distances for each segment, elevation, parking, restrooms, ski waxing huts, warming huts, and usage restrictions. It also features detailed inset maps of the most popular areas of the trail system, including Mazama, Winthrop, and the Sun Mountain Complex. The map maximizes legibility for users through a strong visual hierarchy, minimalist color scheme, muted basemap, and horizontal labels juxtaposed with curving line features.

The map is available throughout the valley as a double-sided, wallet-sized map card (16″ x 25″ when unfolded) and also digitally on the Avenza Maps Store.

Select the images below to see a detailed look at Matt’s map

Making the Map

Matt worked in both Geographic Imager and MAPublisher to create this map. Geographic Imager was used in Adobe Photoshop to spatially reference and refine the shaded relief basemap. From there, the basemap was imported into MAPublisher and provided the foundation to construct the remainder of the map.

Matt used MAPublisher to import his vector data as well as his basemap image. Since his map contains multiple inset maps, he used the Copy MAP Objects From tool to copy his data to another temporary workspace document and crop it to the area for each inset map. He then used the Copy MAP Objects From tool again to bring each of his cropped maps back to the main document as an inset map (check out this blog to see this process in detail). In addition to the MAP Vector Crop tool, Matt also used the Simplify Art tool to smooth ultra-detailed trail lines to be more visually appealing.

Matt also used cartographic tools in MAPublisher to improve his map’s appearance. The Create Halo tool was used to create outlines for the trail lines to make them more legible. Adding halos to elements of a map is a quick and easy way to provide contrast for readers. Matt also used the Create Knockouts tool to create spaces in vector data where text overlapped in an undesirable way.

The MAPublisher LabelPro add-on was essential in Matt’s ability to expedite feature labeling, and allowed him to control and finetune the placement of his labels. Finally, due to the nature of his map being tilted by 12 degrees from North, Matt used the Scale Bar and North Arrow features to easily ensure his finishing touches were oriented correctly.

Learn more about the Avenza Map Contest here, and check out our other Map Spotlight blogs here!

What’s New in Geographic Imager 6.8?

We are very pleased to announce the release of Geographic Imager version 6.8, the latest version of our Geographic Imager® extension for Adobe Photoshop®

With Geographic Imager v6.8, we are announcing the brand new Export Contours tool, official compatibility with macOS Sonoma (version 14), and several performance enhancements and bug fixes.

Here’s what you can expect with the latest Geographic Imager v6.8 release:

Export Contours Tool

Contour lines can be the perfect contextual element to add the finishing touches to your map. However, sometimes it can be difficult to find vector contour line data for your region or to find contour line data at the desired interval. Luckily, the new Export Contour tool in Geographic Imager is the perfect solution for this problem!

The Export Contour tool allows you to use imported elevation data in the form of a Digital Elevation Model (DEM) to create custom contour lines and export them as a vector file for use in MAPublisher. It is easily accessible from the Geographic Imager panel with its very own brand new button.

The Export Contours tool has several parameters that you can customize before exporting, such as interval between lines, base contour offset, and elevation attribute name. These options are easy to set and adjust in the Export Contour dialog box that appears when you click the button on the Geographic Imager panel.

Your contours can be exported in a variety of file formats, including shapefiles, KMZ files or GeoJSON files. If desired, you can add the contours to your current PSD document as paths. This is a convenient way to preview them and make changes if necessary before importing them into MAPublisher.

Once exported, your contours are ready for use in virtually any GIS software or application, such as MAPublisher!

Compatibility with macOS Sonoma

We want our users to enjoy fully optimized freedom with our products. As such, we are also happy to announce that Geographic Imager is now officially compatible with the most recent version of macOS Sonoma (version 14).

Geographic Imager 6.8 is Available Now!

If you would like to learn more about the new Geographic Imager 6.8 features or have any questions, please check out our Support Centre.

Geographic Imager v6.8 is available immediately, free of charge to all current Geographic Imager users with active maintenance subscriptions and as an upgrade for non-maintenance users.

For more information about the brand new Export Contours tool, please visit its support documentation page.

Avenza Releases Geographic Imager 6.8 for Adobe Photoshop

Toronto, ON, May 15, 2024 – Avenza Systems Inc., producers of the Avenza Maps® app for mobile devices and geospatial extensions for Adobe Creative Cloud®, including MAPublisher® for Adobe Illustrator®, is pleased to announce the release of Geographic Imager® version 6.8 for Adobe Photoshop®. This version introduces the new Export Contours tool, official compatibility with macOS Sonoma (version 14), and also includes several performance enhancements and bug fixes.

Geographic Imager for Adobe Photoshop delivers an all-encompassing solution to import, edit, and export geospatial images such as aerial and satellite imagery. Work with digital elevation models, GeoTIFFs, and other popular GIS image formats, using Adobe Photoshop features such as transparencies, filters, cropping, and image adjustments, while maintaining georeferencing and support for hundreds of coordinate systems and projections.

New features for Geographic Imager v6.8 for Adobe Photoshop include:

  • Export Contours tool: The new Export Contours tool allows users to input raster elevation data to output vector contour lines that can be exported for use in MAPublisher.
  • macOS Sonoma compatibility: Geographic Imager officially supports the new macOS Sonoma (version 14) update.
  • Additional performance enhancements and bug fixes

Users require a valid Adobe Creative Cloud subscription and a compatible operating system to utilize the improvements and enhancements offered in Geographic Imager v6.8. For questions and information on how compatibility requirements may affect your organization, please contact our Support Centre.

Geographic Imager v6.8 is available immediately and free of charge to all current Geographic Imager Maintenance Program members and starts at US$399 for non-maintenance upgrades. New fixed licenses start at US$859. Geographic Imager Basic Edition licenses start at US$129. Academic, floating, and volume license pricing is also available. Visit www.avenza.com/geographic-imager for more information.

More about Avenza Systems Inc.

Avenza Systems Inc. is an award-winning, privately held corporation that provides cartographers and GIS professionals with powerful software tools to make better maps. Avenza also offers the mobile Avenza Maps app to sell, purchase, distribute, and use maps on iOS and Android devices.
For further information contact: +1 416-487-5116 – info@avenza.comwww.avenza.com

###

PDF Press Release

Fixed vs. Floating Licenses: Which One is Right for You?

When purchasing Avenza desktop software, MAPublisher and Geographic Imager, you are able to choose between two main license types: a fixed license or a floating license. This blog will cover the primary differences between the two and hopefully help you determine which setup will work best for you!

Fixed License

Fixed licenses allow for the software to be used on only one computer. This is usually sufficient for most single users or small companies, even with just a few licenses. A fixed license is, as the name suggests, fixed to a specific computer. Consequently, this means that it generally cannot be moved freely to another machine, although Avenza does allow you to move your license occasionally. For example, if you have purchased a new computer or if your main computer is being repaired and you need to transfer your fixed license to another computer. This is called rehosting a license. A license rehost is free as long as you have active maintenance on your license, or can be done for a fee if your maintenance is not active or expired.

Floating License

Floating licenses allow an organization to deploy a specific number of licenses that can be used and shared on any number of computers over a network. This is a great solution for any company that has multiple users of MAPublisher or Geographic Imager, especially if all users have their own machine. As such, this means that floating licenses do not need to be rehosted, however there must be a central server from which the licenses are provided to the users within the network. Hence, floating licenses can be further broken down into two categories: cloud floating licenses or local floating licenses.

Cloud Floating License

Cloud floating licenses connect users to their license through the internet. This does not require any additional setup on the organization’s side, and users can access and manage their licenses and servers through a cloud-based customer portal.

Local Floating License

Local floating licenses require a systems administrator at the organization to set up a local server on a computer which meets certain specifications. Only users connected to the local server will be able to check out these licenses on their client computers.

Floating licenses are often the chosen option when an organization would like to share a number of licenses between members. For example, if an organization’s license server holds two seats of MAPublisher licenses, when users on Computer A and Computer B have each checked out MAPublisher licenses, other users on the network are not able to check out a license until the borrowed licenses are checked back in.

An example environment of a floating license system

Floating licenses also give users the ability to borrow a roaming license with their laptops. This is a good solution for users who want to temporarily use MAPublisher and Geographic Imager when they are not connected to the floating license server.

For more information about the licensing options for Avenza desktop products, please contact Avenza sales. For any technical questions about setting up a license server or any other licensing issues, please contact Avenza support.

Map Spotlight: Africa’s Evolving Energy Landscape by Ginny Mason

Africa's Evolving Energy Landscape by Ginny Mason second runner-up of the Avenza Map Contest 2023

This Map Spotlight highlights the second runner-up of the 2023 Avenza Map Contest: Africa’s Evolving Energy Landscape by Ginny Mason with extra contributions from her team at S&P Global Commodity Insights including Melenie Yuen, Justin Cochrane, Roderick Bruce, Josephine Sajbel, Jennifer Tschopp, and Enrico Pedica. This infographic was shown at the African Energy Week conference, which took place in Cape Town, South Africa from October 16th to 20th in 2023. It was created with the versatility that it could function as a small handout as well as a large, wall-mounted map. The handout versions of the map also included a QR code which linked to an interactive online PDF. According to Ginny, this map is “the culmination of Commodity Insights’ midstream and upstream geospatial data, and several other products that we provide to decision makers in this field.”

Select the images below to see a detailed look at Ginny’s map

Making the Map

All map elements of Ginny’s infographic were created with the help of MAPublisher tools. After pre-processing her data using other software, she imported it into MAPublisher and then re-projected it as required. The Copy MAP Objects From tool was also used to quickly grab elements from other maps Ginny had already created.

Since there are several different map elements to this infographic showing various types of energy data, the MAP Attributes panel came in particularly handy for Ginny, allowing her to easily calculate, edit and append data to her attribute tables. Once her data was prepared, she could use the Merge Layers tool and the Split Layers tool to further organize her spatial data layers systematically according to their attributes.

Ginny used the Find Places tool to search for and plot relevant point data on her maps, such as energy plants, gas wells, and oil fields. The MAPublisher LabelPro add-on was used to easily generate labels for all of her data as required. She also used the Simplify Art tool to smooth the edges of excessively detailed lines and area data. Ginny added finishing touches to her map by adding supplemental elements such as a Scale Bar.

See the winners announcement for the 2023 Avenza Map Contest here, and check out our other Map Spotlight blogs here!

Map Spotlight: Korea Between the Wars by Nat Case

This Map Spotlight will be showcasing the runner-up of the 2023 Avenza Map Contest: Korea Between the Wars by Nat Case. This map was part of a series of five maps created by Nat to be published in the memoir Beyond the Border: A Korean’s Journey Between the North and South by Tae-hyok Kim and Nicole Kim Rogers, which follows Tae-hyok’s life in war-ridden mid-century Korea. This particular map is used to set the stage for the beginning of his story when North and South Korea were divided by the 38th parallel post-World War II. Hand-drawn map elements and handwriting-style labels are used to highlight relevant cities, provinces and other features of the Korean peninsula and surrounding regions.

Check out the other maps in the series on Nat’s website, and find Beyond the Border: A Korean’s Journey Between the North and South here.

Select the images below to see a detailed look at Nat’s map

Making the Map

Nat used both MAPublisher and Geographic Imager tools in the creation of this map. In MAPublisher, coastline and political boundaries as well as points were imported and then projected and rescaled. Transforming the projection of the data upon import allowed him to set up the map scale and projection of the document without needing to use the MAP View Editor after import. The coastline data was then exported as a TIFF to be used in the process of creating the textured shaded relief.

In Geographic Imager, a Prisma shaded relief was imported and transformed to the desired projection. It was then cropped and exported to a TIFF as well, to also be used in the process of creating the textured shaded relief.

Both TIFF files were then imported into the Illustrator map file. Nat used the grayscale of the Prisma relief as a mask in Illustrator to create the textured relief around the coastlines and land formations. The hand-drawn texture were created using textures from the Adobe Stock library.

Nat selected handwriting fonts when creating the labels using the Label tool to place them initially. He then adjusted the labels manually as desired.

See the winners announcement for the 2023 Avenza Map Contest here, and check out our other Map Spotlight blogs here!

Map Spotlight: Arctic Carbon Monitoring Network by Christina Shintani

In our first Map Spotlight of the year, we are showcasing the winner of the 2023 Avenza Map Contest: Arctic Carbon Monitoring Network by Christina Shintani, with additional contributions from Jessica Howard (text content) and Julianne Waite (illustration). This map shows eddy covariance flux tower locations in the Arctic that measure the continuous movement of carbon between soils, plants, and the atmosphere. This process is often intriguingly referred to as the Earth’s breath. These towers collect data that is crucial to establishing a comprehensive carbon monitoring network in the Arctic region, which will assist efforts in advancing plausible solutions to curbing permafrost thaw.

A warming Arctic contributes to intensifying wildfires and permafrost thaw, both of which in turn contribute to increased carbon emissions, which is a serious environmental concern. The supporting maps explore the various implications of what is at stake as the Arctic warms three to four times faster than the rest of the world: the Arctic ecosystems at risk, the extent of permafrost thaw, and the shifting of the Arctic from a carbon sink to a new source. Maps like Christina’s are helpful in allowing people to visualize and further understand the progressive impacts of climate change.

Check out more of Christina’s maps on her website, and learn more about the work of Permafrost Pathways here.

Select the images below to see a detailed look at Christina’s map

Making the Map

Christina used both MAPublisher and Geographic Imager tools in the creation of this map. Christina used the Import tool to import the data files she processed in another program, such as QGIS. Following import, she used the MAP Views panel to set up the map scale and projection of the document. Since this map required a polar map projection, the MAP View Editor was also used to reproject data layers from different coordinate systems.

Christina also employed MAP Themes in the creation of her map. Stylesheet Themes were used to symbolize the data on both the main map and supporting maps. These stylesheets could then be used to create legends for the respective maps.

In Geographic Imager, Christina opened her raster data using the Advanced Import, which contains several geoprocessing tools to adjust, crop or transform her imagery before importing it. This can be especially helpful when working with large datasets that may slow the program down if they are not cropped or downsized in some way. She also used the Transform feature to reproject images where necessary.

See the winner announcement for the 2023 Avenza Map Contest here, and check out our other Map Spotlight blogs here!

Quick Georeference Images with Geographic Imager

Sometimes we know enough about an image to georeference it in a faster manner than other images. In Geographic Imager, we call this type of georeferencing a Quick Georeference.

Quick Georeference is a method of georeferencing images that requires two conditions to be met:

  1. The image is not rotated; in other words, true north is oriented at the top of the page
  2. Two control points on the image are known, however these points cannot be aligned on either the X or Y axis

This article will show an example of quick georeferencing. The image used in this demonstration is called Americas_4.tif, and can be found in the Tutorial Data folder which is included with every installation of Geographic Imager.

After opening the image in Geographic Imager, you can confirm that it is aligned with true north. Then click the Georeference button on the Geographic Imager panel.

In the Georeference dialog box, you can click the Add Control Point button to do as such. Click anywhere on the image viewer to add a point. Point 1 will be added to the control point list. You can then adjust the pixel coordinates (PX and PY); these are the coordinates for the points on the image. Type 599 in the PX box and 0 in the PY box.

Next, you want to set the world coordinates that correspond to the pixel coordinates you just entered. You can double-click in the WX, WY or Coordinate System boxes to open the Edit Location dialog box. Here you want to select the WGS 84 coordinate system, and enter a Lat value of 35.917 and Long value of -50.064. After clicking OK, you will see that the world coordinates have been updated in the control point list.

You now want to add your second control point at the location with pixel coordinates of PX = 0 and PY = 456. Following the above steps again, give this point the world coordinates of Lat = 6.731 and Long = -88.417.

Now that you have added your two necessary control points to the image, you are ready to Quick Georeference your image. Next to the Image Coordinate System label, select the Specify… link. In the Choose Coordinate System dialog box, select the [No Coordinate System Specified] link. This opens the Specify Coordinate System dialog box, where you can select the Geodetic > World category, select the “WGS 84” coordinate system and click OK.

Back in the Georeference dialog box, select the Quick Georeference button (lightning bolt icon), and select By Two Reference Points (North/South aligned). You will notice that an additional control point is automatically added to the control point list and image view. Its world coordinates were calculated based on the existing two control point pairs. This occurs because a minimum of three control points are required to reference an image. It is also why the two control points you selected must not align.

To complete your Quick Georeference, simply click OK. Voilà! You will see the reference information appear in the Geographic Imager panel, and further details can be found in the Geographic Imager: General panel.

You can also check out our video tutorial for Quick Georeferencing on YouTube:

To view the step-by-step instructions that constituted the material in this blog post, check out the Quick Georeference tutorial in our Support Centre!

Avenza Releases Geographic Imager 6.7 for Adobe Photoshop

Toronto, ON, September 27, 2023 – Avenza Systems Inc., producers of the Avenza Maps® app for mobile devices and geospatial extensions for Adobe Creative Cloud®, including MAPublisher® for Adobe Illustrator®, is pleased to announce the release of Geographic Imager® version 6.7 for Adobe Photoshop®. This version offers full compatibility with Adobe Photoshop 2024 (version 25), and also includes some performance improvements and bug fixes.

Geographic Imager for Adobe Photoshop delivers an all-encompassing solution to import, edit, and export geospatial images such as aerial and satellite imagery. Work with digital elevation models, GeoTIFFs, and other popular GIS image formats, using Adobe Photoshop features such as transparencies, filters, cropping, and image adjustments, while maintaining georeferencing and support for hundreds of coordinate systems and projections.

Users require a valid Adobe Creative Cloud subscription and a compatible operating system to utilize the improvements and enhancements offered in Geographic Imager v6.7. For questions and information on how compatibility requirements may affect your organization, please contact our Support Centre.

Geographic Imager v6.7 is immediately available and is free of charge to all current Geographic Imager Maintenance Program members and starts at US$379 for non-maintenance upgrades. New fixed licenses start at US$809. Geographic Imager Basic Edition licenses start at US$119. Academic, floating, and volume license pricing is also available. Visit www.avenza.com/geographic-imager for more information.

More about Avenza Systems Inc.

Avenza Systems Inc. is an award-winning, privately held corporation that provides cartographers and GIS professionals with powerful software tools to make better maps. Avenza also offers the mobile Avenza Maps app to sell, purchase, distribute, and use maps on iOS and Android devices.
For further information contact: +1 416-487-5116 – info@avenza.comwww.avenza.com

###

PDF Press Release

News Archive