As of Geographic Imager 5.0, there’s an updated workflow for georeferencing images. Learn more about Georeferencing and work through the tutorial.
Nowadays, it’s common to find great orthophotos and satellite imagery on the Web. However, after downloading these (sometimes) large files, you might find that some don’t have any georeferencing. Most likely these files are in an image format supported by Adobe Photoshop(e.g. JPG or TIF) and you can georeference it using the Geographic Imager Georeference tool.
These are the requirements to georeference an image:
- Knowing the coordinate system of the image (e.g. Mercator projection, State Plane system Alabama East, UTM system NAD 83 Zone 17 N..etc)
- Finding three or more points from the image to assign coordinate values to each of them. These points are known as ground control points.
The first thing you need to know is the coordinate system or projection of the image you are georereferncing. If you are unsure about which coordinate system the image uses, contact the data provider or search the metadata of the image on the Internet. If you cannot get the information of the coordinate system assigned to the image, you might want to try georeferencing with different coordinate systems to make the map as precise as possible.
The second requirement is working with the ground control points. One ground control point consists of several values: 1) Pixel X coordinate, 2) Pixel Y coordinate, 3) Ground X coordinate (e.g. longitude), and 4) Ground Y coordinate (e.g. latitude). Furthermore, to make georeferencing easier, ground control points must be clearly identifiable in the image. Cultural features such as road intersection, a sharp corner of a lot or boundary are good examples of locations used as ground control points.
Now that you know what you’ll need, we’ll demonstrate a georeference workflow using the Geographic Imager Georeference tool and Google Earth.
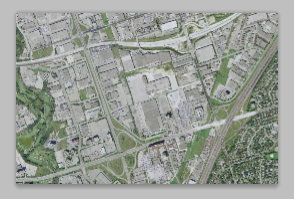
Step 1: Obtain a non-georeferenced image
This image is in JPEG format and there is no georeference information associated with it. In order to transform it to another coordinate system or projection, mosaic with other images, or align the image to vector work using MAPublisher for Adobe Illustrator, the image must first be georeferenced.
Step 2: Obtain the required information
As indicated above, two key pieces of information are required to georeference an image: a) the coordinate system of the image and b) defining ground control points
a) The coordinate system of the image
The image, collected from Google Earth, is projected in a coordinate system called WGS84 / Pseudo Mercator (this projection is common to Web based mapping systems and is also known as Web Mercator or Google projection).
b) Defining ground control points
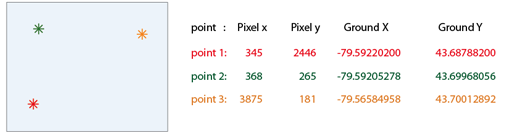
We’ll need to define at least three ground control points for georeferencing. Below are the steps for finding out one of the ground control points.
On the non-georeferenced image, decide which spot to use as a point of reference. It should be available on Google Earth where you’ll find the X,Y coordinate values. For the first point, we’ll use the corner boundary between the pavement and a golf course.

Using Google Earth, find the exact same spot as the one decided in the non-georeferenced image. Place a point symbol to help identify the coordinate values. Record the collected latitude and longitude values. The latitude and longitude values are at the centre of the point symbol ![]() in the Google Earth window.
in the Google Earth window.
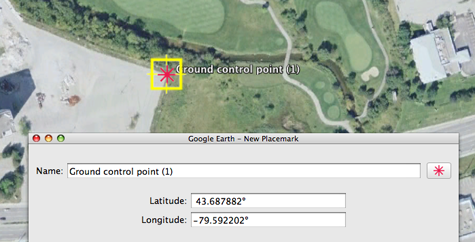
Find the coordinates of two additional ground control points. The latitude and longitude values are in decimal degree format and the coordinate system of those values are in the geodetic system “WGS84”.
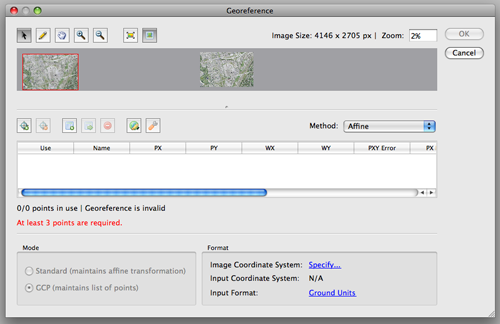
Step 3: Georeference in Geographic Imager
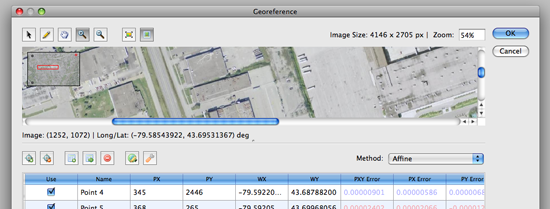
In Geographic Imager, click the Georeference tool button ![]() in the Geograhpic Imager main panel (or choose File > Automate > Geographic Imager : Georerence). The Georeference dialog box will open.
in the Geograhpic Imager main panel (or choose File > Automate > Geographic Imager : Georerence). The Georeference dialog box will open.
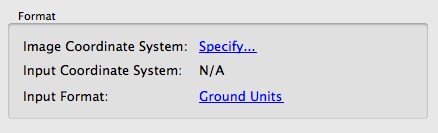
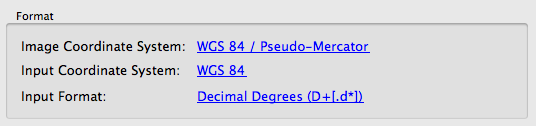
First, we’ll need to set the proper image coordinate system and input coordinate system (the information from Step 2a). In the Format section, click the blue “Specify” link to open the Input Format dialog box.
Here we’ll specify two parameters: Image Coordinate System and alternate input coordinate system. The image of the coordinate system is WGS84 / Pseudo-Mercator as found at Step 2a. Click the “Specify” button to find the coordinate system from the coordinate systems list.
The option “Use alternate input coordinate system” will not have to be selected if the X,Y coordinate values are collected in the Eastings/Northings in the WGS84 / Pseudo-Mercator coordinate system. When those latitude and longitude values are collected, those values are collected in the decimal degree format and the values are in degree in WGS84. We will use those latitude and longitude values for the georeferencing. Specify the destination coordinate system as WGS84.
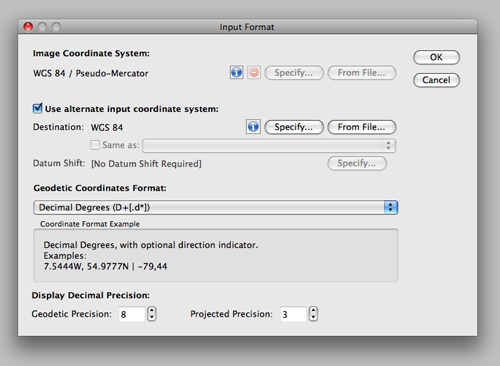
When the settings are made, click OK to close the Input Format dialog box. All the selected coordinate system for each setting will be indicated in the Format section of the Georeference dialog box.
The next step is to enter the three ground control points collected from Google Earth. Click the pencil tool at the top of the Georeference dialog box and click a point for one of the ground control points collected at the previous steps ![]() .
.
As soon as one point is clicked on the preview image, it will add one row in the Georeference table. This row contains the point name, PX (Pixel x coordinate), PY (Pixel y coordinate), WX (World X coordinate), and WY (World Y coordinate).

For WX and WY, enter the longitude and latitude, respectively, for the first ground control point.

Repeat the same steps for the second and third ground control points.
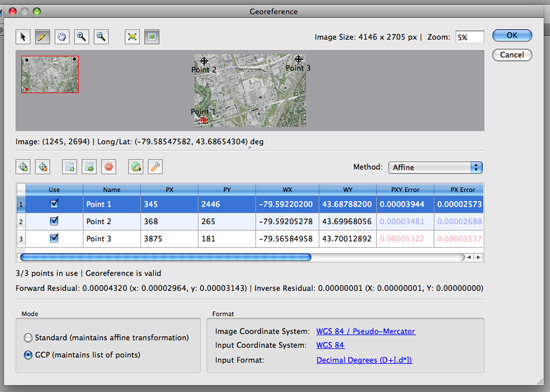
As soon as you enter three points, Geographic Imager will display the residual error values on the table for the accuracy assessment.
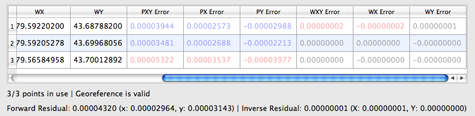
A residual error is the computed difference between an observed source coordinate and a calculated source coordinate. It is the measure of the fit between the true locations and the transformed locations of the output control points. A high residual error indicates possible error in either the observed source coordinates or the reference coordinates of the reference point in question.
When the error is particularly large, you may want to remove and add control points to adjust the error. As a general rule, apply several different transformation methods, select/deselect questionable points and select the method and reference points that yield the minimum residual error, assuming that the defined reference points are correct. Residual values are calculated via the associated error values between computed values and entered values through either the affine or various polynomial methods.
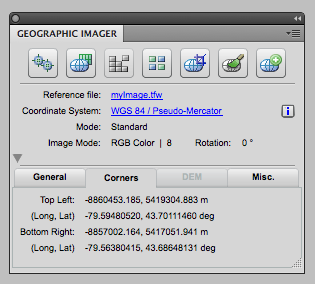
Once completed, the Geographic Imager main panel will indicate the georeference information of the image. Don’t forget to save the file once it is complete. Now your image is ready for any Geographic Imager function. You can also bring this image into MAPublisher for Adobe illustrator and align it to other GIS data.